A simple HTTP/2 server using Vapor 4
Get started with server-side Swift using the Vapor 4 framework. Learn how to build a really simple HTTP/2 backend server.
What is HTTP/2?
In short, it’s the second major version of Hypertext Transfer Protocol (HTTP), but obviously you’re not here for the short version. HTTP/2 is a huge upgrade, it was derived from the experimental SPDY protocol, nowadays it’s widely used by about 40% of all the websites. Yes it’s time to upgrade your infrastructure (soon). 😉
HTTP
The HTTP protocol is basically a client-server (request-response) communication protocol where the client asks for a resource and the server returns a response (a HTML document, a stylesheet, a JavaScript file, or anything else…). This all happens on top of a TCP/IP connection layer using sockets. If you don’t know anything about TCP/IP ports and sockets, you should read the linked article.
HTTP2 is secure by default, so it only works via TLS/SSL, but for the sake of simplicity I’m not going into the details of HTTPS, cryptography or secure connection.
HTTP is an application layer protocol, that describes how you can interact with various resources identified by an URL/URI (or URN). HTTP is simple (a few methods like GET, POST), yet extensible (via headers), stateless, but not sessionless (just think about Cookies) and it’s definitely dominating the world wide web (browsers). 🌎
HTTP version 1.1 has some disadvantages. It is a text based unencrypted protocol, plus as websites evolved and more and more resources were needed in order to render a webpage, HTTP/1.1 started to face some speed issues, because you are only allowed to download only one resource at a time on a HTTP/1.1 connection.
You have to wait for it…
Request multiplexing
The best (and most advanced feature) of HTTP/2 is request multiplexing. It allows you to download multiple files asynchronously from the server. This enables browsers and other applications to think about loading resources in a nice promie-like way instead of the old-fashioned blocking connection. You can send all your requests on the same connection and they can be fulfilled in parallel. 🚀
Server Push
First of all HTTP/2 server push is not a push notification system for applications. You can use it to send additional cache-able resources to the client that is not requested, but it’s highly anticipated in future requests. Real quick example: if the client requests for an index.html file, you can push back the corresponding sytle.css and main.js files in the response, so they’ll be there by the time the client actually needs them.
Header compression, encryption, binary format, etc.
I could continue with the benefits of the HTTP/2 but I believe the most important factor here is speed. HTTP/2 has a lighter network footprint and also eliminates some security concerns which is great for everyone. You can read more about the protocol on other sites, but for now let’s just stop right here.
Let’s start creating our HTTP/2 server in Swift using Vapor 4! 🤓
SwiftNIO2 + Vapor4 = HTTP/2 support
Apple’s cross-platform asynchronous event-driven network application framework supports HTTP/2 for a while. Vapor uses SwiftNIO since version 3, but only the 4th major version will have the brand new protocol support. Anyway it was a very long road, but we’re finally getting there and I’m really glad that this is happening now.
Both Swift, SwiftNIO and Vapor matured a lot in the past few years, if you’d like to spend more time on the server-side now it’s the best time to start learning these technologies and frameworks. Vapor 4 is going to be amazing, and I hope that server-side Swift apps will dominate the market in a few years. #swifttotalworlddomination
Backend language “hype” evolution: PHP -> node.js -> Swift?
Project setup
As usual, let’s start by creating a brand new project using the Vapor toolbox:
vapor new HTTP2Server
cd HTTP2Server
vapor update -y
This will give you a starter Xcode project template, based on the latest Vapor 4 branch. If you are completely new to Vapor, you should read my beginners tutorial about Vapor to get a basic understanding of the main components of the framework.
If you have an issue with Vapor, you should join the official Discord server, you’ll find some surprisingly good stuff and a really helpful community there. 😊
Certificate generation
Also because HTTP/2 is a secure protocol by default, you’ll need your own SSL certificate. You can generate a self-signed cert.pem and a key.pem files with the following command (fill out the details with some fake data and press enter). 🔐
openssl req -newkey rsa:2048 -new -nodes -x509 -days 3650 -keyout key.pem -out cert.pem
That’s it, you should use these files for testing purposes only, also you still have to trust this self-signed local certificate. Your browser will tell you how to do it. 🤷♂️
Vapor 4 configuration with HTTP/2 support
In order to enable HTTP/2 support in Vapor 4, you have to register a new HTTPServer Configuration service. You can do this in the configure.swift file.
import Vapor
import NIOSSL

public func configure(_ app: Application) throws {

    // access home directory:
    // let homePath = NSString(string: "~").expandingTildeInPath

    // use .env file to provide cert / key paths:
    // let certPath = Environment.get("CERT_PATH")!
    // let keyPath = Environment.get("KEY_PATH")!

    let homePath = app.directory.workingDirectory
    let certPath = homePath + "/cert.pem"
    let keyPath = homePath + "/key.pem"

    let certs = try! NIOSSLCertificate.fromPEMFile(certPath)
        .map { NIOSSLCertificateSource.certificate($0) }

    let tls = TLSConfiguration.forServer(
        certificateChain: certs,
        privateKey: .file(keyPath)
    )

    app.http.server.configuration = .init(
        hostname: "127.0.0.1",
        port: 8080,
        backlog: 256,
        reuseAddress: true,
        tcpNoDelay: true,
        responseCompression: .disabled,
        requestDecompression: .disabled,
        supportPipelining: false,
        supportVersions: Set<HTTPVersionMajor>([.two]),
        tlsConfiguration: tls,
        serverName: nil,
        logger: nil
    )
}
First you have to load your certificate chain with the corresponding private key file. Next you have to make a proper TLS configuration using the SSL certificate. The last thing that you have to create is a new HTTP configuration object.
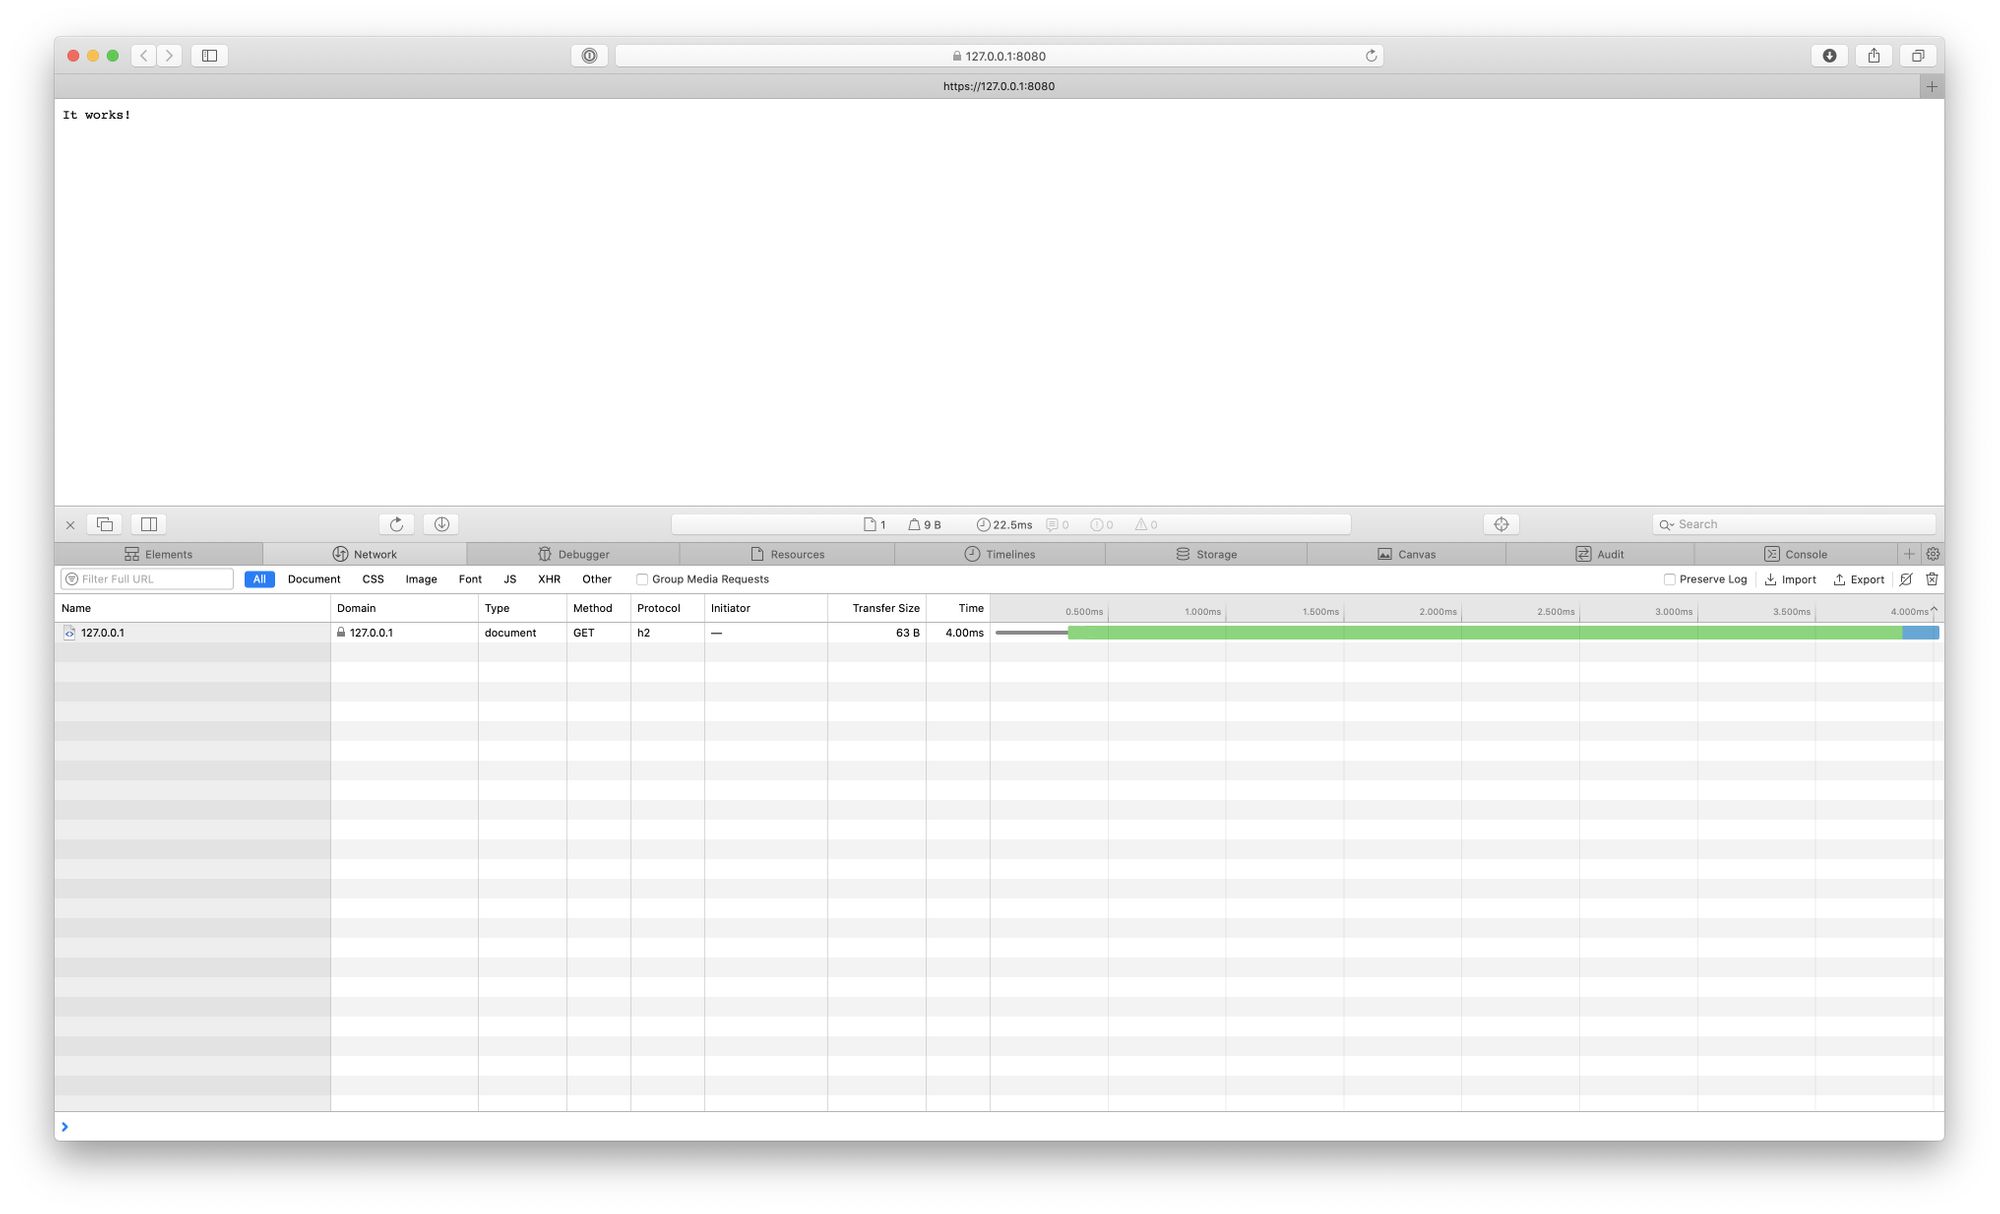
If you run the project and accept the self-signed certificate you should see in the inspector that the protocol is h2, which means HTTP/2 is alive. Congratulations! 🎉
As you can see this article is more like a quick starting point to get HTTP/2 up and running in Vapor 4. Please share the article if you liked it & subscribe to my monthly newsletter below. Thanks for your help, bye! 🙏
Related posts

10 short advices that will make you a better Vapor developer right away
As a beginner server side Swift developer you'll face many obstackles. I'll show you how to avoid the most common ones.
A generic CRUD solution for Vapor 4
Learn how to build a controller component that can serve models as JSON objects through a RESTful API written in Swift.
A simple HTTP/2 server using Vapor 4
Get started with server-side Swift using the Vapor 4 framework. Learn how to build a really simple HTTP/2 backend server.
AJAX calls using Vapor 4
Learn how to implement Asynchronous JavaScript and XML (AJAX) calls using Leaf templates and Vapor 4 as a server.
