Beginner's guide to Server side Swift using Vapor 4
Learn how to build and host your very first backend application using Vapor 4 and the brief history of server side Swift.
Brief history of my backend career
For me, it all started with PHP. It was my first real programming language (HTML & CSS doesn’t count). I always loved to work on backend projects, I’ve written my very first modular backend framework with one of my good friend during the university years. It was an amazing experience, I learned so much from it.
Fast forward a decade. The backend ecosystem have changed a lot during this time. The term “full-stack” developer was born alongside with node.js and people slowly started to turn their backs on PHP. I really don’t mind that, but still PHP was revolutionary in some ways. It was easy to learn, OOP (from PHP5) and for some reason it got real popular. Sometimes I really miss those times… #entropy
Node.js on the other hand was a really good step forward the right direction. It brought JavaScript to the backend, so developers could write both the frontend and the backend code in the same programming language. The V8 engine with and the event-loop was extremely efficient compared to PHP’s approach.
The problem with the node ecosystem is npm and JavaScript itself. We’ve seen the rise and fall of io.js, ayo also there is CoffeScript, TypeScript, oh did I mentioned Babel already? I mean it’s fine, evolution is a good thing, the ECMAScript standards tries to keep everything under control, but here’s the real deal:
JavaScript is rotten at it’s core.
Don’t get me wrong, in the past I loved JS. It was amazing to see such a dynamic “functional” programming language. I’ve written lots of JavaScript (both frontend and node.js) code but nowadays I only see that nothing of the issues have been really fixed (only patched) from the past 10 years. Haters gona hate. I don’t care. 🤷♂️
Now what? Should I use Go, Ruby, Python or old-school C on the server side? Well I’ve tried all of them. Both Ruby, Go and Python is a little bit harder to learn, since they have a “strange” syntax compared to JS or PHP. C on the other hand is a low-level language, so you have to deal with pointers a lot. Believe me: that’s not how you want to spend your time. What about Java? Netty seems cool, but I’m not a big fan of the language at all.
So I was getting bored with the server side, that’s why I left it and started to work as an iOS developer. I had to write Objective-C code before the ARC times. Foundation and UIKit was brand new for me, anyway after a few years Apple released Swift. Most of the people reacted like this:
Swift is just like (type safe) JavaScript
The state of server side Swift in 2020
Apple open sourced the Swift programming language in the end of 2015. This event started everything. Lots of server side frameworks were born that time. Unfortunately Swift was quite a young language and it changed a lot. ABI stability was just a dream and the buggy Foundation framework on linux was quite a bad environment to develop a stable backend application. Long story short, most of them are dead by now, except: Vapor. 💀
Let’s have a silent minute for all the other frameworks (some are still alive):
I belive that the cause of this problem was that back in the days everyone had to implement it’s own solution for server side networking (low level, socket base) including security and encryption features (for SSL/TLS based secure transport) plus HTTP and websocket service support. That’s quite a lot of work already.
The Swift Server Work Group was formed (end of 2016) to create a cross platform, portable, low level native server side API framework to act as a basic building block for server side projects. The SSWG was moving forward slowly (they just released one proof of concept version in 2017), but then suddenly in 2018 Apple released SwiftNIO. Wait, what? Bastards. They secretly developed SwiftNIO and it changed everything. It was like Netty, but written in 100% Swift. NIO is a really low level asynchronous event-driven application framework designed for high performance (non-blocking IO) & scalability for servers and clients.
It seems like Apple has some real plans for SwiftNIO. Maybe they just want to replace all the Java based internal system on a long term. Who knows, but one thing is for sure:
SwiftNIO is here to stay.
SwiftNIO added support for the HTTP/2 protocol in early 2019, Vapor was the first framework that used NIO under the hood. Perfect, Vapor and Kitura were the most popular Swift frameworks, but Perfect slowly faded away and IBM announced that they won’t work anymore on Kitura from 2020. Vapor is still doing great, it has a great community (~18k GitHub stars), so we can only hope for the best.
I started to work with Kitura in the past, but I migrated away since the development of Kitura was already too slow for me. Vapor on the other hand became extremely popular and surprisingly well-designed. Vapor 3 was a huge step into the right direction and trust me: Vapor 4 is amazing! It’s your best option to create backend apps using Swift. Of course you can use SwiftNIO, but if you are looking for a high level framework instead of a low level tool, maybe Vapor is your ONLY option. Is this bad? I don’t think so.
Sorry about the long intro, but it was quite a journey. As you can see a lot happened during the past few years, Swift is now a mature language, SwiftNIO arrived, Vapor is better than ever. Some people think that server side Swift is dead, because of the past events and now IBM also left the party. Vapor also announced that they’ll shut down Vapor Cloud a hosting service for Vapor applications. IMHO this means that now they can focus more time & resources on the core building blocks.
I believe that this is just the beginning of the server side Swift era.
Should I use SwiftNIO or Vapor?
SwiftNIO is a low level framework that relies on non-blocking IO. Network operations are non-blocking from the processing thread perspective. All the blocking operations are delegated to additional channels, those trigger events on network operations. Yep, this means that if you choose NIO you have to deal with all the low level stuff by yourself. This is amazing if you know a lot about networking technologies. 🤓
The purpose of SwiftNIO is being a fast, stable and scalable underlying toolkit for building high performance web frameworks like Kitura, Vapor and other network service (not just HTTP) providers.
With NIO you can build a lot more, you can make database connectors like postgres-nio, push notification services (APNSwift), basically you can support any kind of network protocols.
On the other hand, if you are planning to build a REST API or a similar backend for your existing (or future) mobile application please, do not use SwiftNIO directly unless you have a superior understanding of network layers, event loops, pipelines, channels, futures and many more… 😳
Vapor is a web framework for Swift written on top of SwiftNIO. It gives you an easy to use foundation for your next website, API, or cloud based service project. If you are new to the server side, I’d highly recommend to get familiar with Vapor instead of NIO. Vapor is way more easy to learn, you don’t have to make your hands dirty with low level components, instead you can focus on building your app.
How to get started with Vapor?
First of all, you don’t need extra tools to start with Vapor. If you have a PC or a mac you can start using the framework right ahead. You just need a working Swift installation on your device.
You can grab the API template project from Vapor’s GitHub repository. However I’d like to show you the Vapor toolbox, which is a really convenient helper tool for managing your projects.
Vapor’s command line interface provides shortcuts and assistance for common tasks.
It’s available both for macOS and Linux, you can simply install it through brew or apt-get. 📦
# macOS
brew install vapor/tap/vapor

# Linux
eval $(curl -sL https://apt.vapor.sh)
sudo apt-get update
sudo apt-get install vapor
Now you are ready to use the vapor command. Let’s create a brand new project.
vapor new myProject
cd myProject
vapor update -y
The vapor update -y command is almost equivalent with swift package generate-xcodeproj. It’ll update the required dependencies and it’ll generate an Xcode project file. Starting from Xcode 11 you can double click on the Package.swift file as well. This means you don’t have to run anything from the command line, since SPM is now integrated into Xcode, the app can load all the dependencies for you.
The major difference between the two approaches is that if you geneate an
.xcodeprojfile, your dependencies are going to be linked dynamically, but if you are using thePackage.swiftfile the system will use static linking. Don’t worry too much about this, unless you are using a package with a reserved system name, like Ink by John Sundell. If so, you have to go with static linking.
You can also use vapor build to build your project and vapor run to execute it. This comes useful if you don’t want to mess around with makefiles or interact directly with the Swift Package Manager tool. You can enter vapor --help if you want to learn more about the Vapor toolbox.
The architecture of a Vapor application
Let’s examine the project template. I’ll quickly walk you through everything.
Run
The entire project is separated into two major targets.. The first one is App and the second one is called Run. You’ll find the source code for every target inside the Sources directory. The Run executable target is the beginning of everything. It’ll load your App library (target) and fires up the Vapor backend server with proper configs and environmental variables. It contains just one single main.swift file that you can run. 🏃
App
This one is where you put your actual backend application code. It’s a library package by default which you can import inside the Run executable target. There are some top level functions that you have to define, these are going to be under the App namespace. e.g. app(_:), configure(_:), routes(_:). Under the App target you’ll find three major files. The app.swift file is responsible for returning the configured application instance itself. It uses an environment object as an input so you can run the app in prod, dev or test mode (this is on of the reasons why Vapor apps have a dedicated run target). Also if you want to perform some initial actions before your server starts, you should put those here, since there is no boot.swift file anymore.
Config
In the configure.swift file you can customize your application. This is where you should register all the various services, use middlewares, set the router object, etc. For example if you want to use a database connection, a static file hosting service or a template engine this is the place where you can set it up.
Services is a dependency injection (also called inversion of control) framework for Vapor. The services framework allows you to register, configure, and initialize anything you might need in your application.
Services are the “low-level” components in Vapor. This means that most of the underlying components are written as a service. The router is a service, middleware system works as a service, database connections are services, even the HTTP server engine is implemented as a service.
This is incredibly useful, because you can configure or replace anything inside your configuration file, there are only a few hardcoded elements, but everything is customizable. In Vapor 4 there is a brand new dependency injection API based on Swift extensions. Letting the compiler do the hard work is always nice, plus this way services are more easy to discover, since the type system knows everything. 😉
Routes
The routes.swift file is where you can add the actual routes for your router. But first, what is routing? If you don’t know what’s HTTP, please stop here and start reading about networks first. Sorry.😅
Routing refers to how an application’s endpoints respond to client requests.
This is already well-explained in the expressjs docs. Let’s say that routing is the subsystem that connects your code with the API endpoints. You can define these connections inside the routes function. For example if you have a Cat class with a returnAllKittens method you can hook that up to the GET /cats endpoint by declaring a route. Now if you send a GET HTTP request to the /cats endpoint, the return all kitten method will be called and you’ll see lots of happy kittens. 🐱🐱🐱
Controllers
Controllers are code organization tools. With the help of them you can group related API endpoints together. In the sample project there is a Todo controller which is responsible of CRUD operations on Todo models. The router connects the endpoints by using this controller, and the controller will query (create, request, update, delete) the appropriate models using the available database connection.
Models
Vapor has a neat database abstraction tool (an ORM framework) called Fluent. Models represent database entries usually related to this Fluent library. In the sample project the Todo class defines the name of the database scheme as a static property. Also each field in the table has a corresponding property in the entity. These properties are marked with a special thing called Property Wrappers. Through them you can customize the name and the behavior of the db columns. Personally I love this new approach! ❤️
Migrations
Just like models, migrations have changed a lot through time. In Vapor 4 you have even more power to customize how you want to migrate from one database scheme to another. For example if you need to introduce a new field in your model, you can alter your database according to your needs by using migrator functions. Same thing applies for other scheme alteration methods. I’m really happy with this new approach, Fluent matured a lot and this new concept reminds me to my old PHP framework. 👍
Tests
I was missing this from Vapor 3, but finally Vapor 4 includes a new testing framework called XCTVapor. This framework makes easier to test your application with just a few lines of code. If you look at the Tests folder you’ll some basic test scenarios for the Todo application. It’s a good starting point. ✅
Tips & tricks for using to Vapor 4
Let’s write some server side Swift code, shall we? Well, let me show you some best practices that I learned during the creation of this website. Yes, that’s right, this site is made with Swift and Vapor 4. 😎
Custom working directory in Xcode
If you run your project through Xcode, you might want to setup a custom working directory, otherwise your application will look for assets from a cursed place called DerivedData. This can cause some issues if you are using a templating engine or the public file middleware with the default config, since the system won’t find proper routes. In order to fix this you just click your target name next to the stop button and select the Edit Scheme… menu item. Select Run and click on the Options tab.
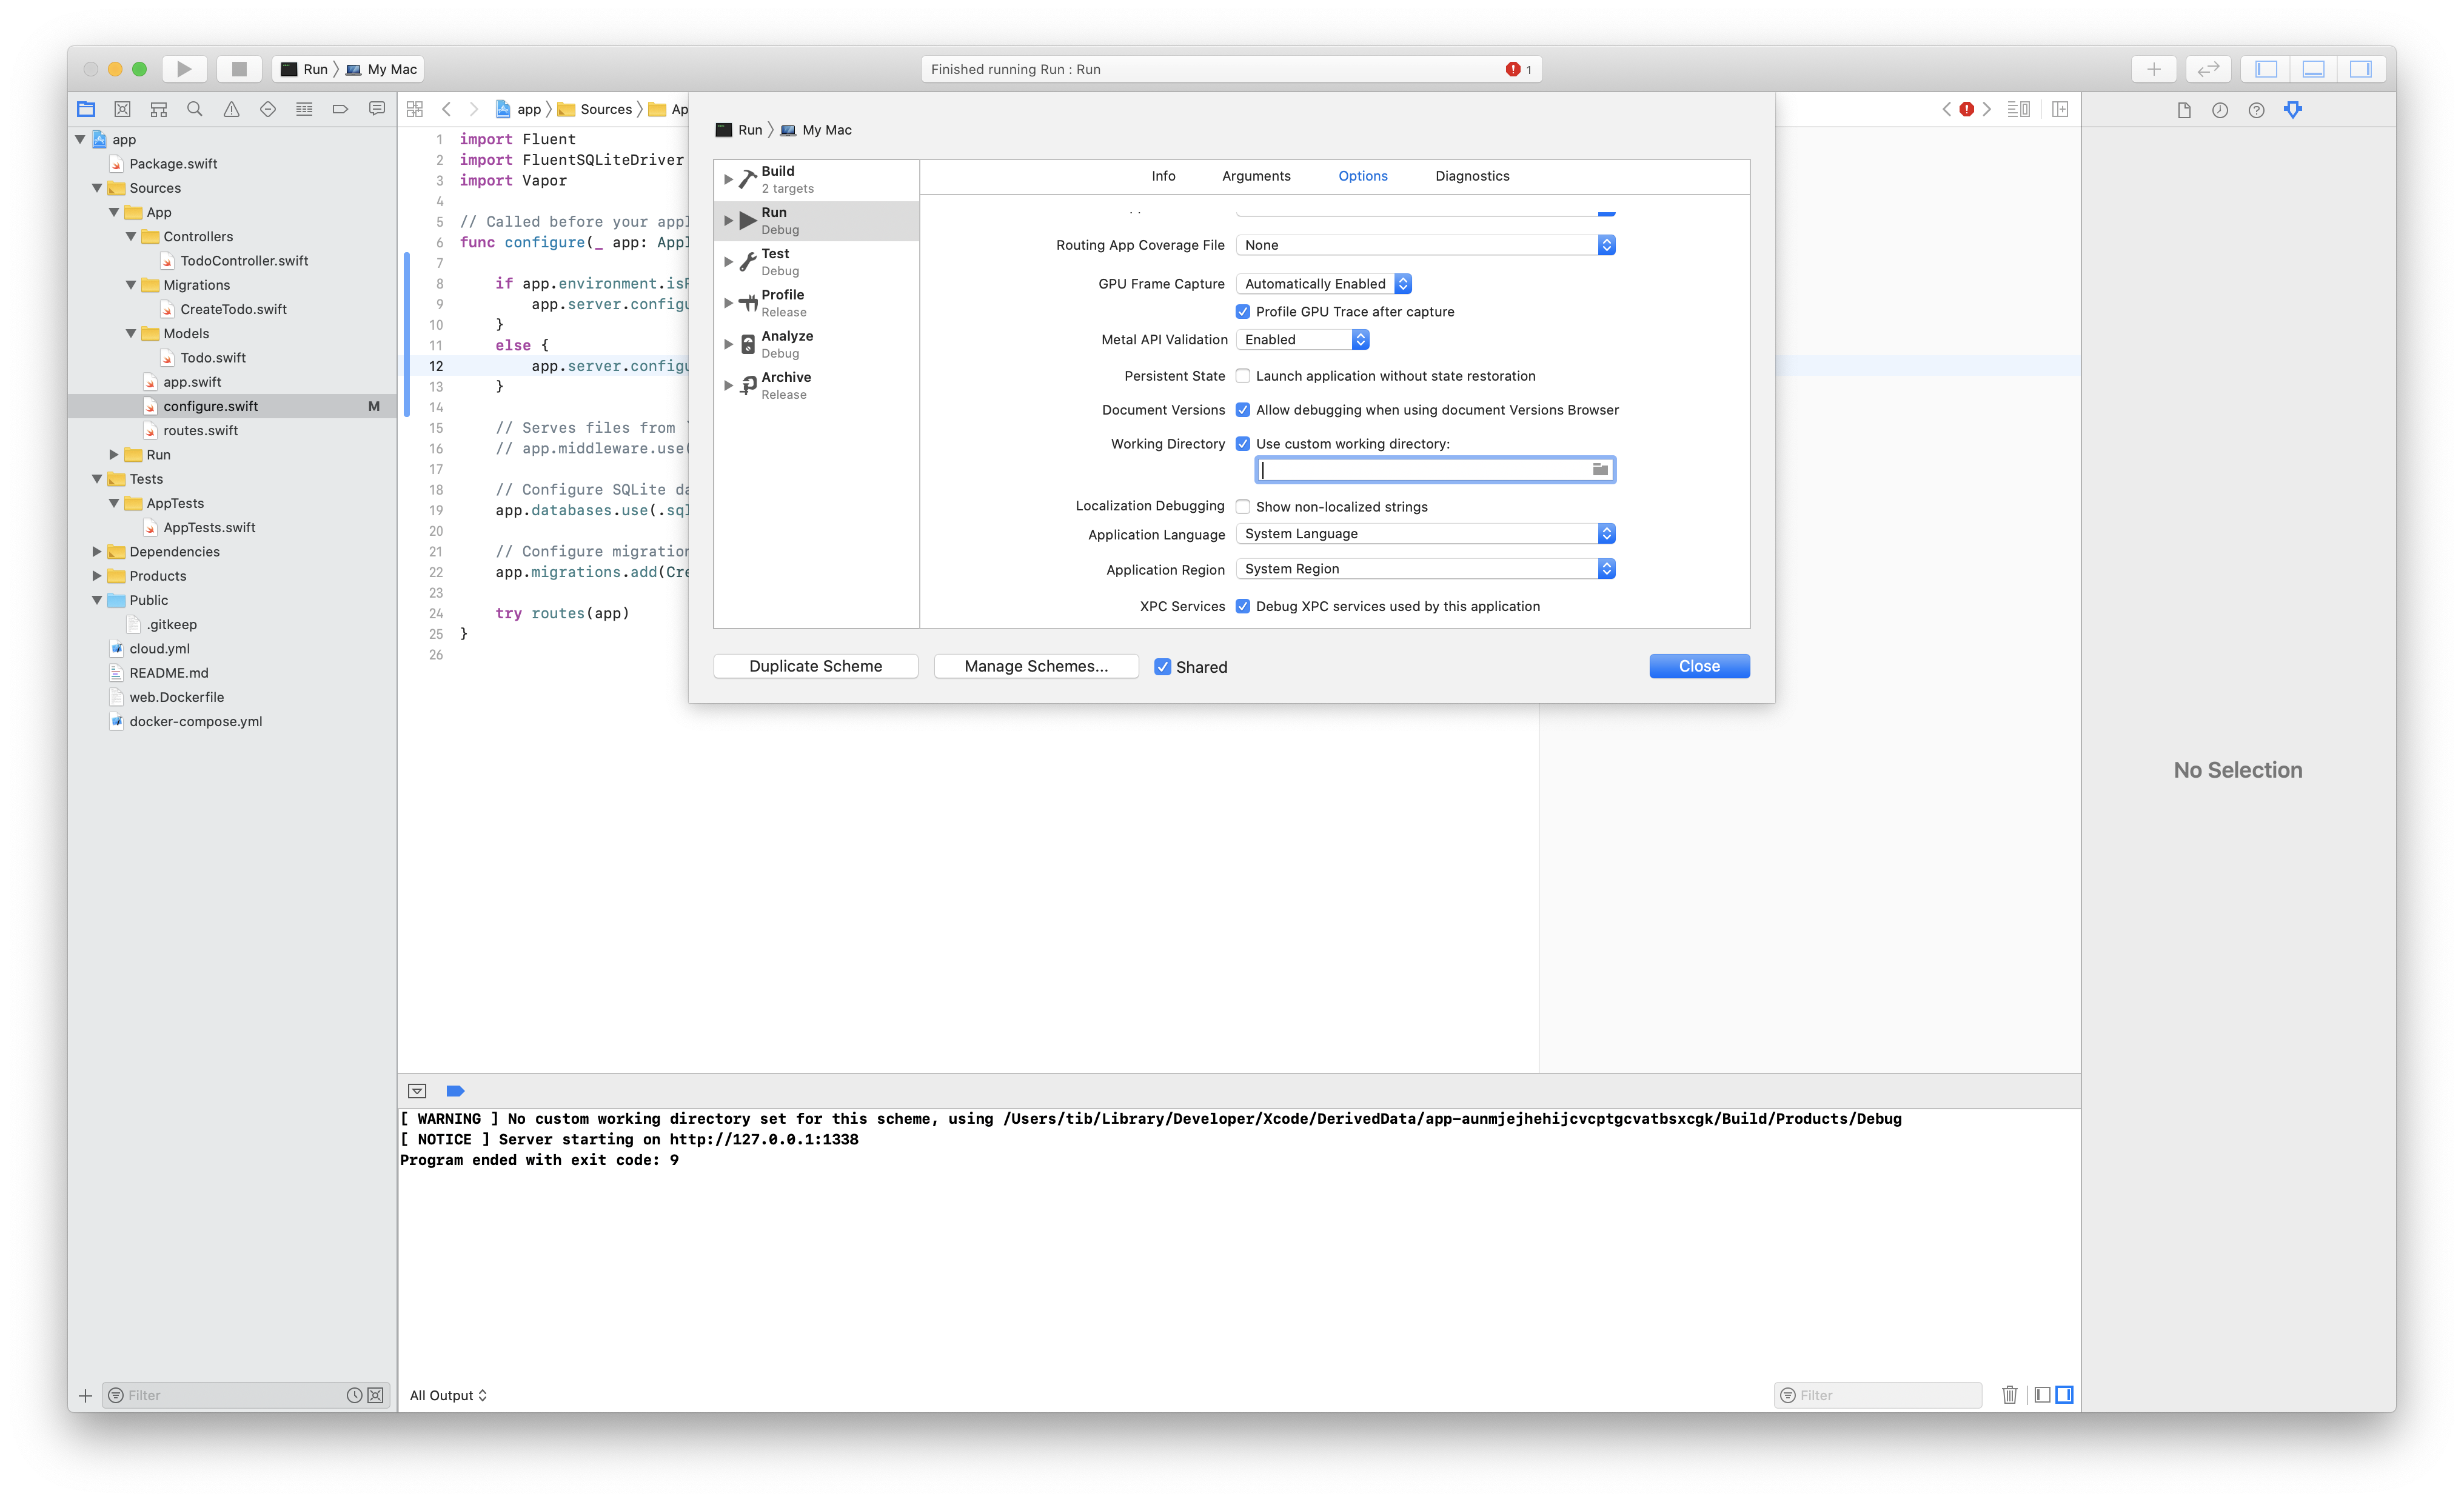
Here is the original issue on GitHub.
Using system provided directories
There are a few built-in directories available through the application object.
func configure(_ app: Application) throws {

    print(app.directory.workingDirectory)
    print(app.directory.publicDirectory)
    print(app.directory.resourcesDirectory)
    print(app.directory.viewsDirectory)
    //...
}
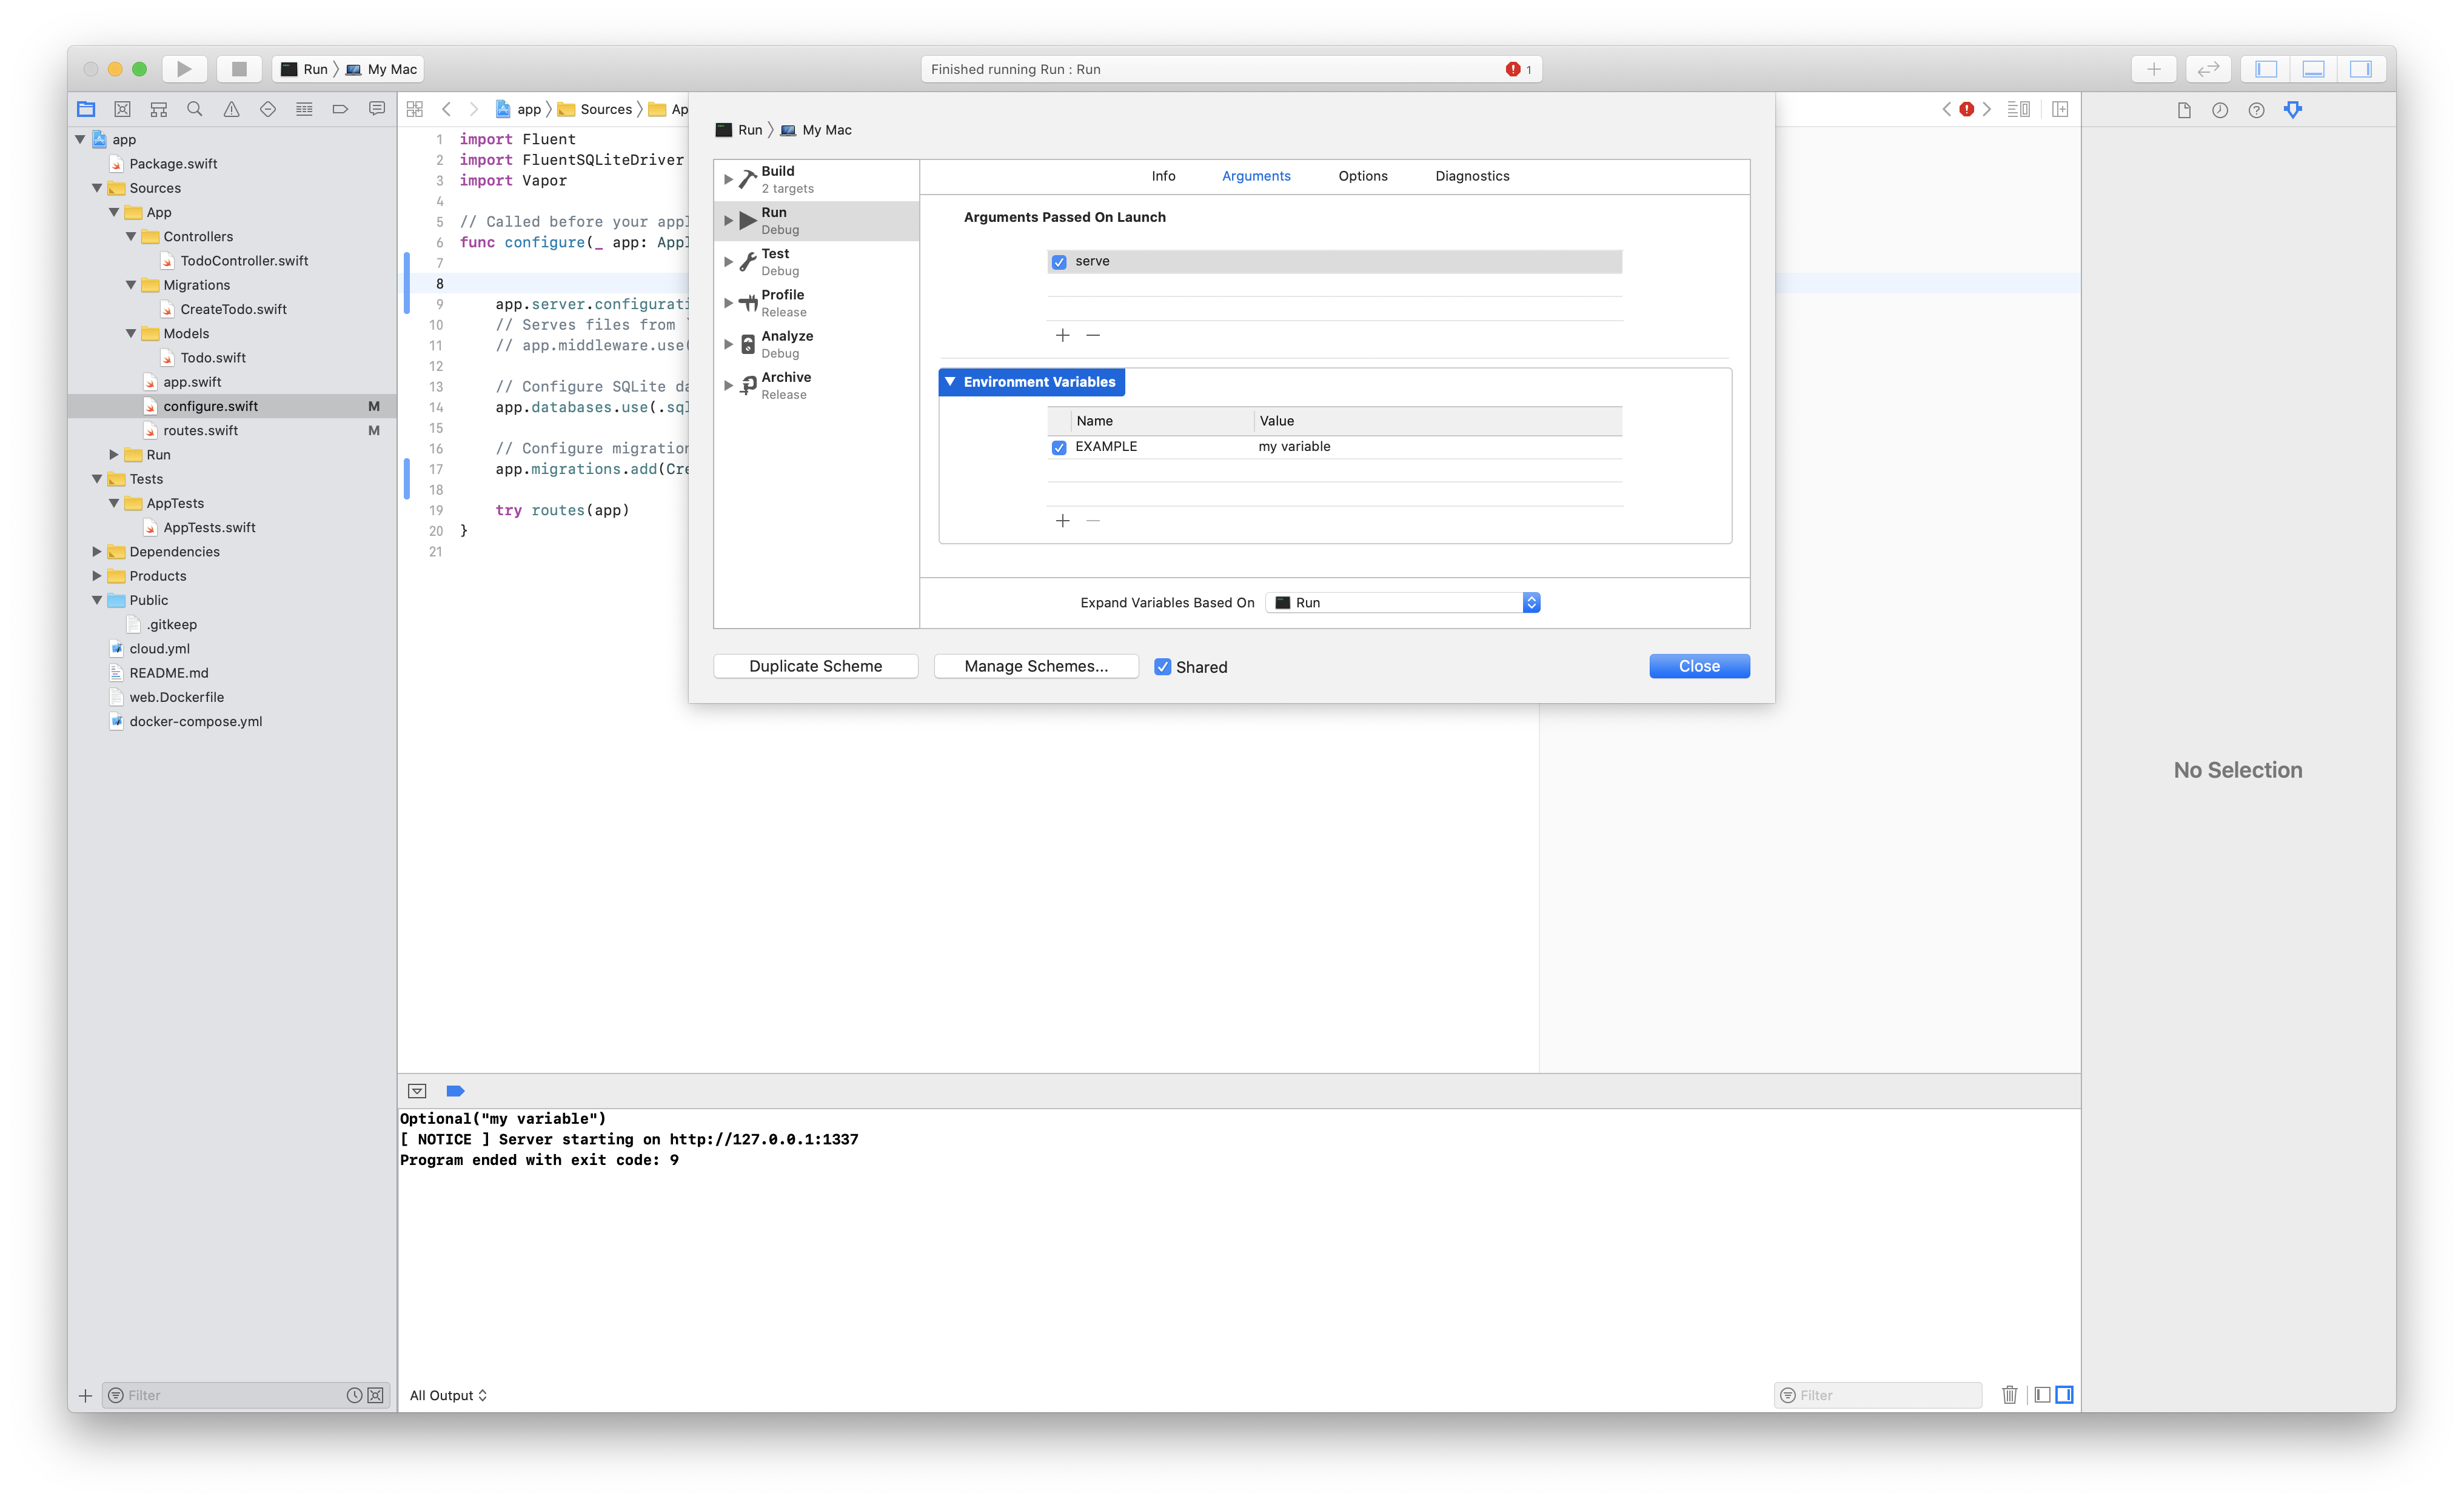
Using the environment
You can pass your secrets to a Vapor application by using environment variables. You can also check the current env for run modes like dev, prod, test, but the best thing is that Vapor 4 supports .env files! 🎉
func configure(_ app: Application) throws {
    let variable = Environment.get("EXAMPLE") ?? "undefined"
    print(variable)
    print(app.environment.name)
    print(app.environment.arguments)
    print(app.environment.commandInput)

    if app.environment.isRelease {
        print("production mode")
    }

    //...
}
Ok, but how the hell can I run the app in production mode? Also how do I provide the EXAMPLE variable? Don’t worry, it’s actually pretty simple. You can use the command line like this:
export EXAMPLE="hello"; swift run Run serve --env production
This way the application will run in production mode and the EXAMPLE variable will have the hello value. Good news is if you don’t like to export variables you can store them in a .env file just like this:
EXAMPLE="hello"
Just put this file to the root folder of your project, it’s also quite a good practice simply .gitignore it. Now you can run with the same command or use the vapor toolbox:
swift run Run serve --env production
# NOTE: toolbox command is not accepting env in the current beta
vapor build && vapor run serve --env production
You can also set custom environment variables and launch arguments if you edit your scheme in Xcode. It’s called Arguments right next to the Options tab inside the scheme editor popup.
Change port number and hostname
The most simple way to change port number and hostname is to override the HTTP server config:
func configure(_ app: Application) throws {
    app.http.server.configuration.hostname = "127.0.0.1"
    app.http.server.configuration.port = 8081
    //...
}
Alternatively you can run Vapor with the following commands:
swift run Run serve --hostname api.example.com --port 8081
This way you don’t have to hardcode anything, but you can run your application with a custom config.
Router parameters
Routing in Vapor 4 changed a little bit, but for the good. You can name your router parameters. If you want to have a route with a param, you should define something like this /hello/:world. So in this example the world is a dynamic parameter key that you can use to access the underlying value through the request.
app.get("hello", ":world") { req -> String in
    let param = req.parameters.get("world") ?? "default"
    //let number = req.parameters.get("world", as: Int.self)
    return "Hello, \(param.capitalized)!"
}
Type casting is also supported, you can provide the type as a second parameter for the .get() method.
Dynamic routes and custom HTTP responses
Responding to all the routes is not that hard, there are two built-in options available. You can use the * string or the .anything path component case. Also there is the ** route which is equivalent with the .catchall component if you need to handle multiple route levels like: /a/b/c.
Returning a custom HTTP Response is also straightforward, but let me show you a quick example:
app.routes.get(.catchall) { req -> Response in
    .init(status: .ok,
          version: req.version,
          headers: ["Content-Type": "text/xml; charset=utf-8"],
          body: .init(string: "<h1>Hello world</h1>"))
}
Custom JSON encoding / decoding strategy
I don’t like to use de default JSON encoder / decoder, since they come with an “ugly” strategy for dates. Have no worries, in Vapor 4 you can customize literally everything. The ContentConfiguration object is what you are looking for. You can set new strategies for all the urls and media types.
let jsonEncoder = JSONEncoder()
jsonEncoder.dateEncodingStrategy = .secondsSince1970
ContentConfiguration.global.use(encoder: jsonEncoder, for: .json)
From now on every single JSON object will use this encoder strategy. Problem solved. 🙃
How to return custom content types?
Well, the answer is simple. You just have to conform to the Content protocol. If you do so you can simply return your own objects in the response handler. Now if you check the /cats API endpoint, all of the three cats will be there waiting just for you to feed them (encoded using the global JSON encoder by default).
struct Cat: Content {
    let name: String
    let emoji: String
}

func routes(_ app: Application) throws {
    app.get("cats") { req -> [Cat] in
        return [
            .init(name: "Lucky", emoji: "🐱"),
            .init(name: "Biscuit", emoji: "🍪"),
            .init(name: "Peanut", emoji: "🥜"),
        ]
    }
}
Codable routing is amazing, it means that you don’t have to mess with manual encoding / decoding. 😻
How to deploy & host your Swift server?
Writing your backend server is just one part of the whole story. If you want to make it available for everyone else you have to deploy it to the cloud. This means that you need a hosting provider. Since Vapor Cloud is shutting down you have to find alternative hosting solutions. If you are looking for FREE alternatives, Heroku is one of your best chance. There is a migration guide from Vapor Cloud to Heroku.
On the other hand, I prefer AWS, since it has everything that a backend developer or a devops guy can dream about. You should note that if you choose AWS, you can use a T2.nano instance completely FREE for 1 year. You can fire up your instance in about 10 minutes including your account registration and by the end of the process you’ll have a working Linux machine on Amazon. 💪
Running the server forever
Whats next? Your Swift application server needs to run constantly. By default if a crash happens it’ll stop running. That ain’t good, because you won’t be able to serve clients anymore. This is the main reason why we need to daemonize the app first. Daemons can run constantly, if they stop they’ll be automatically re-spawned, so if a crash happens the app will start again from scratch. 👹
Under Linux you can create a systemctl upstart proces to run an application as a daemon. There is a great tutorial about how to setup upstart script and respawn process. I’ll just make a quick walkthrough about what you should do. First, create a new file under /lib/systemd/system/todo.service with the following contents.
[Unit]
Description=Todo server daemon

[Service]
User=ubuntu
Group=ubuntu
WorkingDirectory=/path/to/my/server/
ExecStart=/path/to/my/run/script
Restart=always

[Install]
WantedBy=multi-user.target
Of course you should provide your own configuration (path, user, group and exec command). The ExecStart parameter can be swift run Run, but please be careful you might have to use your full path of your swift installation (which swift). When you are ready with the service file you have to give some permissions and then you should reload the daemons. Finally you should enable your service and start it. 👻
chmod +x /lib/systemd/system/todo.service
systemctl daemon-reload
systemctl enable todo.service
systemctl start todo
systemctl status todo
From now on you can use sudo service todo start|stop|restart to manage your backend server.
Reverse proxy using nginx
I usually put my servers behind a proxy. Nginx can be used as web server, reverse proxy, load balancer and HTTP cache. You can install it by running the sudo apt-get install nginx command. Maybe the hardest part is to setup a proper nginx configuration for your Vapor application server with HTTP2 and SSL support. A very basic HTTP nginx configuration should look something like this.
server {
    listen 80;
    server_name mytododomain.com;

    location / {
        proxy_pass              http://localhost:8080;
        proxy_set_header        Host $host;
        proxy_set_header        X-Real-IP $remote_addr;
        proxy_set_header        X-Forwarded-For $proxy_add_x_forwarded_for;
        proxy_set_header        X-Forwarded-Proto $scheme;
        proxy_read_timeout      90;
    }
}
You should put this configuration file inside the /etc/nginx/sites-available/mytododomain.com folder. This setup simply proxies the incoming traffic from the domain to the local port through pure HTTP without the S-ecurity. Symlink the file by using ln -svf [source] [target] into the sites-enabled folder and run the following command to reload nginx configurations: sudo service reload nginx. Alternatively you can restart nginx sudo service nginx restart. If you messed up someting you can always use sudo nginx -t.
How to support HTTPS?
Remember HTTP is a cleartext protocol, so basically everyone can read your network traffic. Apple says all data is sensitive - they are damn right about that - and using a secure channel will give you benefits like encryption, confidentiality, integrity, authentication and identity. If you want a proper server you have to use HTTPS. 🔒
HTTP + SSL = HTTPS ❤️ ATS
In order to support secure HTTP connections, first you’ll need an SSL certificate. Letsencrypt can give you one for FREE. You just have to install certbot. You can request a new certificate and setup SSL automatically for your nginx sites by using certbot. Follow the instructions and enjoy your secure API service written in Swift language.
sudo apt-get update
sudo apt-get install software-properties-common
sudo add-apt-repository ppa:certbot/certbot
sudo apt-get update
sudo apt-get install python-certbot-nginx

sudo certbot --nginx
Don’t forget to set up a cron job to renew your certificates periodically sudo certbot renew --dry-run.
You can check the strength of your server configuration at ssllabs.com. They are going to measure how secure is your server. By default letsencrypt will give you an A result, which is perfectly fine, but you can aim for an A+ grade if you want. I don’t want to get into the details now. 🤫
App Transport Security (ATS) was introduced to make iOS apps more secure. It enforces developers to talk only through secure HTTPS channels to your backend server. You can always disable ATS, but instead of that you should try to solve the underlying issues. The first thing that you can do is to enable CFNetwork Diagnostic Logging inside your iOS application. Now your network requests will log more information to the console. You can also check your server connection from terminal with the nscurl or openssl commands.
nscurl --ats-diagnostics http://example.com/api/endpoint
openssl s_client -connect example.com:443
That’s all folks. 🐰
Building, running, hosting your own Swift application on the server requires a lot of work. If you are new to the topic it can be challenging to find proper resources, since Vapor tutorials are mostly for version 3. I really hope that in this article I covered everything that noone else did. Vapor 4 is going to be a great release, I can’t wait to work with the final version. I also hope that more and more Server side Swift applications will be born.
Related posts

10 short advices that will make you a better Vapor developer right away
As a beginner server side Swift developer you'll face many obstackles. I'll show you how to avoid the most common ones.
A generic CRUD solution for Vapor 4
Learn how to build a controller component that can serve models as JSON objects through a RESTful API written in Swift.
A simple HTTP/2 server using Vapor 4
Get started with server-side Swift using the Vapor 4 framework. Learn how to build a really simple HTTP/2 backend server.
AJAX calls using Vapor 4
Learn how to implement Asynchronous JavaScript and XML (AJAX) calls using Leaf templates and Vapor 4 as a server.
