How to create your first website using Vapor 4 and Leaf?
Let's build a web page in Swift. Learn how to use the brand new template engine of the most popular server side Swift framework.
Project setup
Start a brand new project by using the Vapor toolbox. If you don’t know what’s the toolbox or how to install it, you should read my beginner’s guide about Vapor 4 first.
// swift-tools-version:5.3
import PackageDescription

let package = Package(
    name: "myProject",
    platforms: [
       .macOS(.v10_15)
    ],
    dependencies: [
        // 💧 A server-side Swift web framework.
        .package(url: "https://github.com/vapor/vapor", from: "4.32.0"),
        .package(url: "https://github.com/vapor/leaf", .exact("4.0.0-tau.1")),
        .package(url: "https://github.com/vapor/leaf-kit", .exact("1.0.0-tau.1.1")),
    ],
    targets: [
        .target(name: "App", dependencies: [
            .product(name: "Leaf", package: "leaf"),
            .product(name: "Vapor", package: "vapor"),
        ]),
        .target(name: "Run", dependencies: ["App"]),
        .testTarget(name: "AppTests", dependencies: [
            .target(name: "App"),
            .product(name: "XCTVapor", package: "vapor"),
        ])
    ]
)
Open the project by double clicking the Package.swift file. Xcode will download all the required package dependencies first, then you’ll be ready to run your app (you might have to select the Run target & the proper device) and write some server side Swift code.
Getting started with Leaf 4
Leaf is a powerful templating language with Swift-inspired syntax. You can use it to generate dynamic HTML pages for a front-end website or generate rich emails to send from an API.
If you choose a domain-specific language (DSL) for writing type-safe HTML (such as Plot) you’ll have to rebuild your entire backend application if you want to change your templates. Leaf is a dynamic template engine, this means that you can change templates on the fly without recompiling your Swift codebase. Let me show you how to setup Leaf.
import Vapor
import Leaf

public func configure(_ app: Application) throws {

    app.middleware.use(FileMiddleware(publicDirectory: app.directory.publicDirectory))

    if !app.environment.isRelease {
        LeafRenderer.Option.caching = .bypass
    }

    app.views.use(.leaf)

    try routes(app)
}
With just a few lines of code you are ready to use Leaf. If you build & run your app you’ll be able to modify your templates and see the changes instantly if reload your browser, that’s because we’ve bypassed the cache mechanism using the LeafRenderer.Option.caching property. If you build your backend application in release mode the Leaf cache will be enabled, so you need to restart your server after you edit a template.
Your templates should have a .leaf extension and they should be placed under the Resources/Views folder inside your working directory by default. You can change this behavior through the LeafEngine.rootDirectory configuration and you can also alter the default file extension with the help of the NIOLeafFiles source object.
import Vapor
import Leaf

public func configure(_ app: Application) throws {

    app.middleware.use(FileMiddleware(publicDirectory: app.directory.publicDirectory))

    if !app.environment.isRelease {
        LeafRenderer.Option.caching = .bypass
    }

    let detected = LeafEngine.rootDirectory ?? app.directory.viewsDirectory
    LeafEngine.rootDirectory = detected

    LeafEngine.sources = .singleSource(NIOLeafFiles(fileio: app.fileio,
                                                    limits: .default,
                                                    sandboxDirectory: detected,
                                                    viewDirectory: detected,
                                                    defaultExtension: "html"))

    app.views.use(.leaf)

    try routes(app)

}
The LeafEngine uses sources to look up template locations when you call your render function with a given template name. You can also use multiple locations or build your own lookup source if you implement the LeafSource protocol if needed.
import Vapor
import Leaf

public func configure(_ app: Application) throws {

    app.middleware.use(FileMiddleware(publicDirectory: app.directory.publicDirectory))

    if !app.environment.isRelease {
        LeafRenderer.Option.caching = .bypass
    }

    let detected = LeafEngine.rootDirectory ?? app.directory.viewsDirectory
    LeafEngine.rootDirectory = detected

    let defaultSource = NIOLeafFiles(fileio: app.fileio,
                                     limits: .default,
                                     sandboxDirectory: detected,
                                     viewDirectory: detected,
                                     defaultExtension: "leaf")

    let customSource = CustomSource()

    let multipleSources = LeafSources()
    try multipleSources.register(using: defaultSource)
    try multipleSources.register(source: "custom-source-key", using: customSource)

    LeafEngine.sources = multipleSources

    app.views.use(.leaf)

    try routes(app)
}

struct CustomSource: LeafSource {

    func file(template: String, escape: Bool, on eventLoop: EventLoop) -> EventLoopFuture<ByteBuffer> {
        /// Your custom lookup method comes here...
        return eventLoop.future(error: LeafError(.noTemplateExists(template)))
    }
}
Anyway, this is a more advanced topic, we’re good to go with a single source, also I highly recommend using a .html extension instead of leaf, so Xcode can give us partial syntax highlight for our Leaf files. Now we are going to make our very first Leaf template file. 🍃
You can enable basic syntax highlighting for .leaf files in Xcode by choosing the Editor ▸ Syntax Coloring ▸ HTML menu item. Unfortunately if you close Xcode you have to do this again and again for every single Leaf file.
Create a new file under the Resources/Views directory called index.html.
<!DOCTYPE html>
<html>
  <head>
    <meta charset="utf-8">
    <meta name="viewport" content="width=device-width, initial-scale=1">
    <title>#(title)</title>
  </head>
  <body>
    <h1>#(body)</h1>
  </body>
</html>
Leaf gives you the ability to put specific building blocks into your HTML code. These blocks (or tags) are always starting with the # symbol. You can think of these as preprocessor macros (if you are familiar with those). The Leaf renderer will process the template file and print the #() placeholders with actual values. In this case both the body and the title key is a placeholder for a context variable. We’re going to set these up using Swift. 😉
After the template file has been processed it’ll be rendered as a HTML output string. Let me show you how this works in practice. First we need to respond some HTTP request, we can use a router to register a handler function, then we tell our template engine to render a template file, we send this rendered HTML string with the appropriate Content-Type HTTP header value as a response, all of this happens under the hood automatically, we just need to write a few lines of Swift code.
import Vapor
import Leaf

func routes(_ app: Application) throws {

    app.get { req in
        req.leaf.render(template: "index", context: [
            "title": "Hi",
            "body": "Hello world!"
        ])
    }
}
The snippet above goes to your routes.swift file. Routing is all about responding to HTTP requests. In this example using the .get you can respond to the / path. In other words if you run the app and enter http://localhost:8080 into your browser, you should be able to see the rendered view as a response.
The first parameter of the render method is the name of the template file (without the file extension). As a second parameter you can pass anything that can represent a context variable. This is usually in a key-value format, and you can use almost every native Swift type including arrays and dictionaries. 🤓
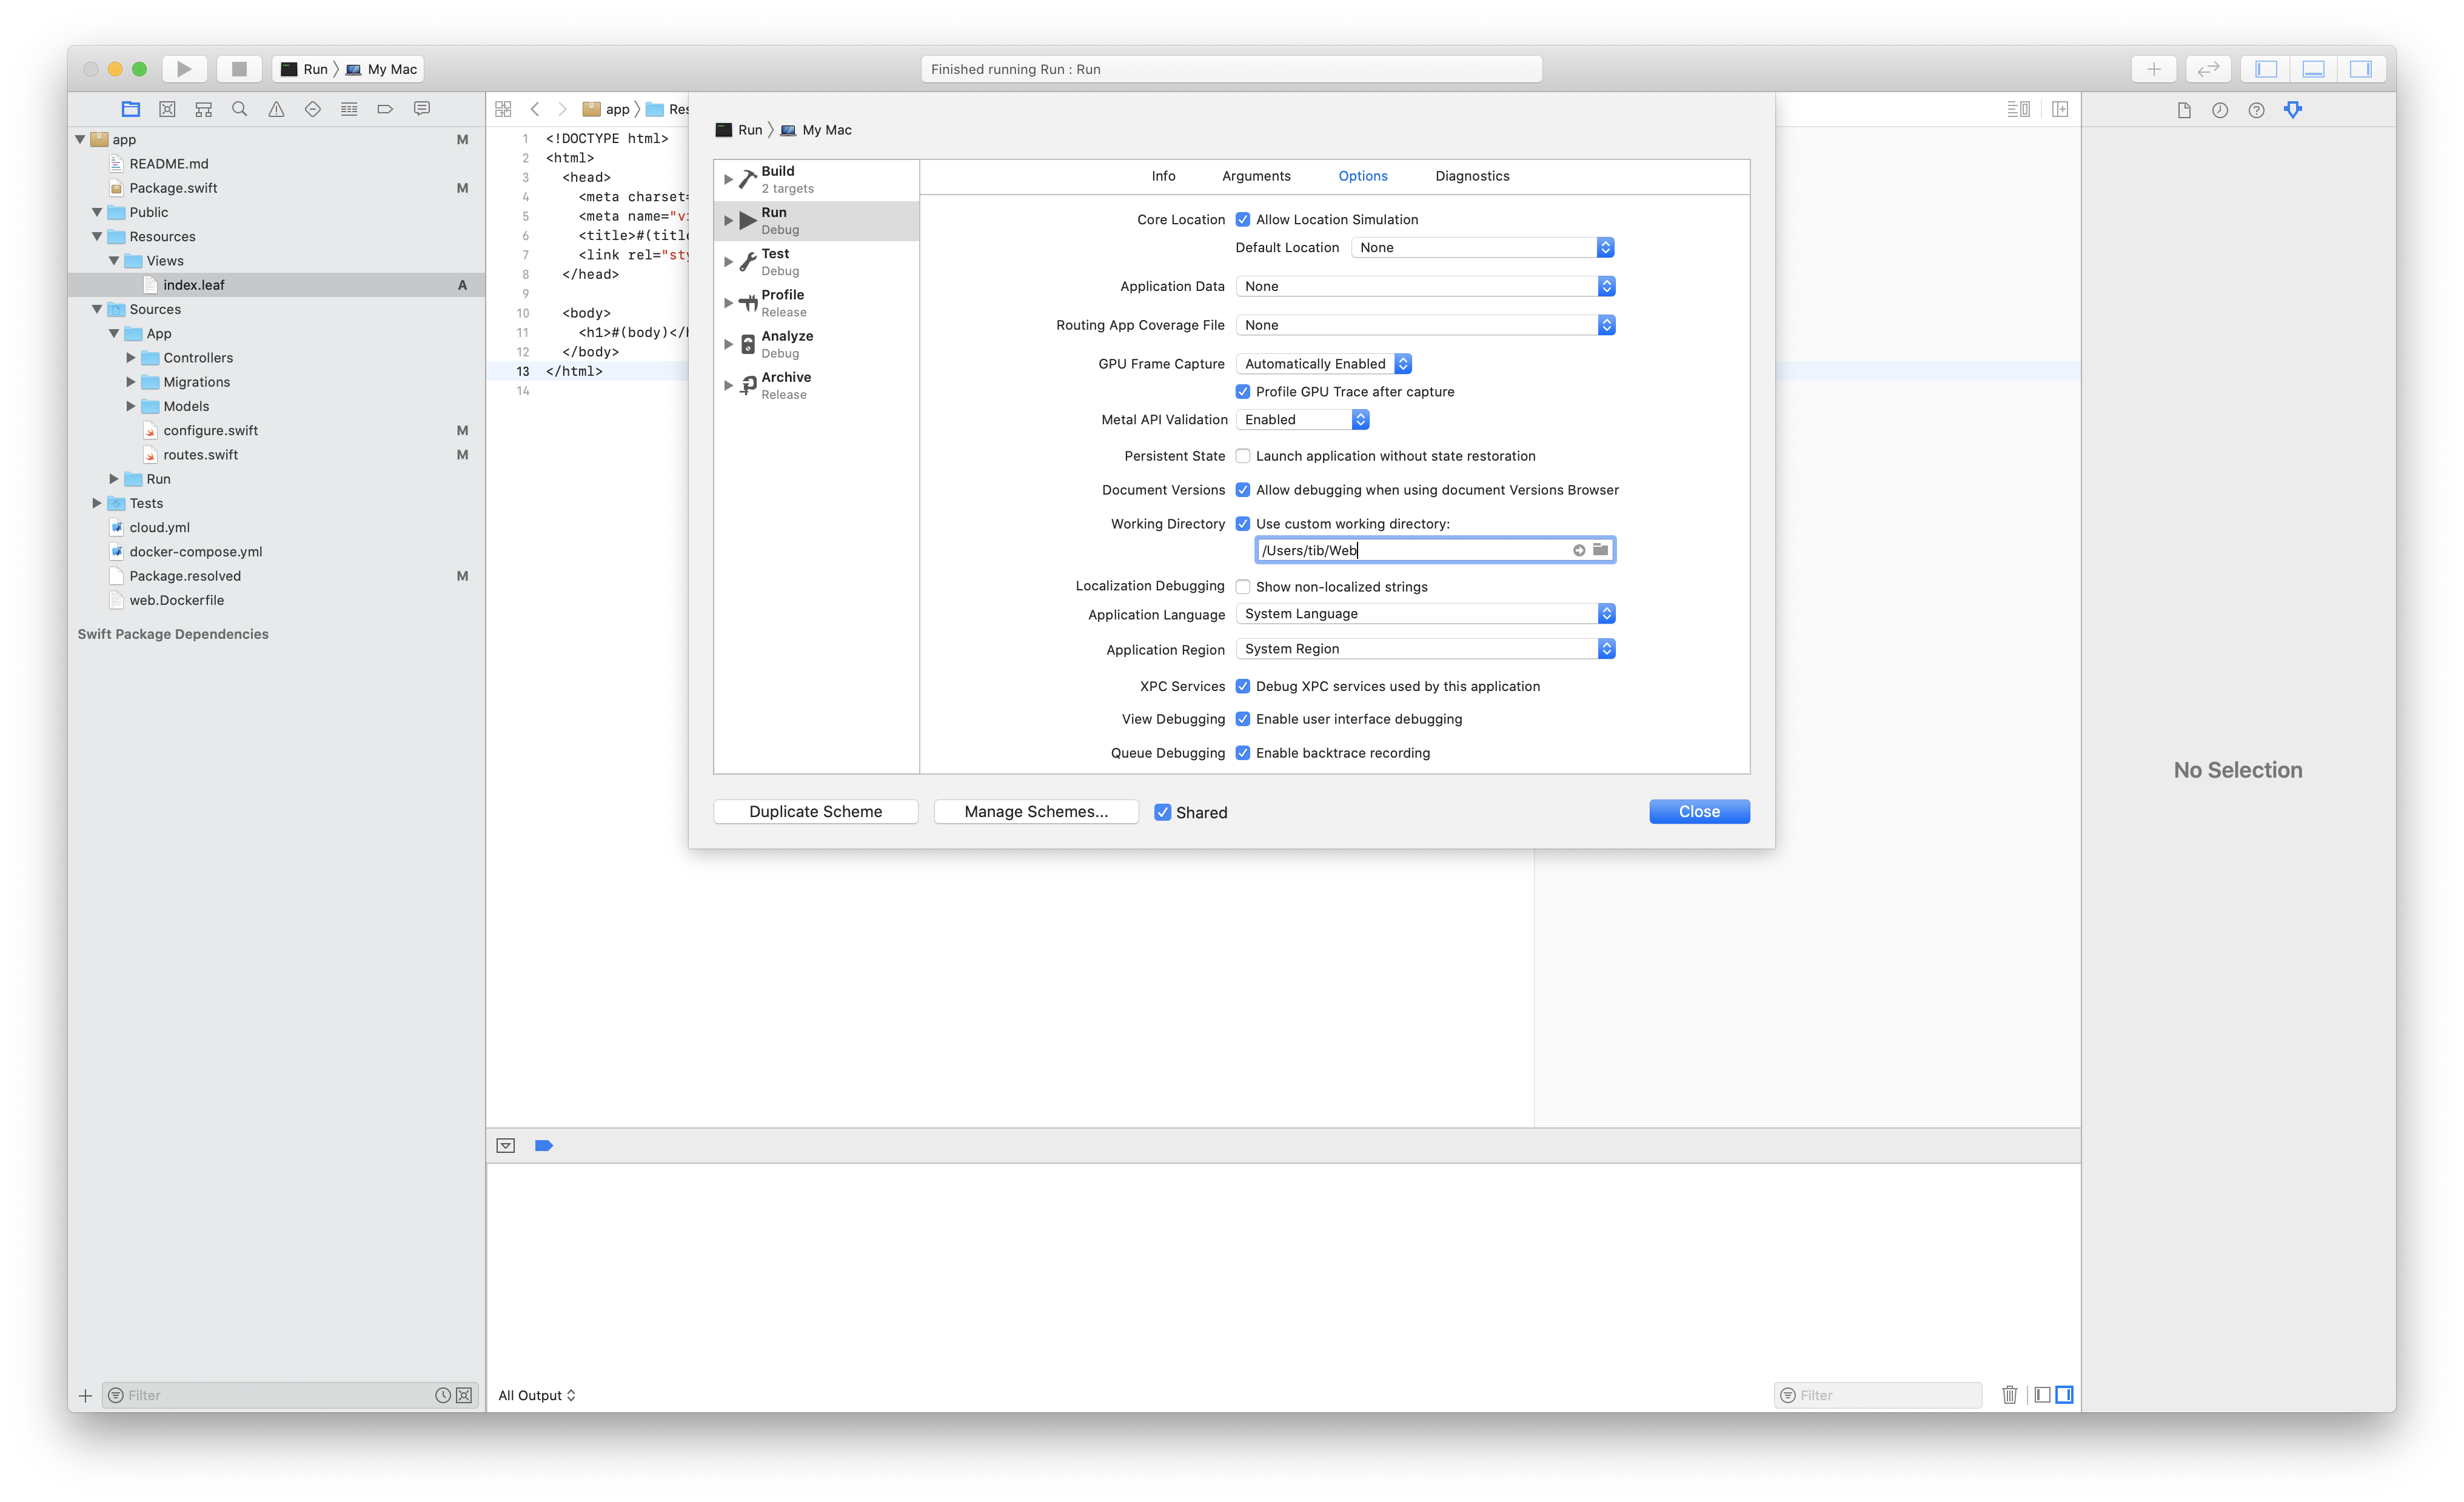
When you run the app using Xcode, don’t forget to set a custom working directory, otherwise Leaf won’t find your templates. You can also run the server using the command line: swift run Run.
Congratulations! You just made your very first webpage. 🎉
Inlining, evaluation and block definitions
Leaf is a lightweight, but very powerful template engine. If you learn the basic principles, you’ll be able to completely separate the view layer from the business logic. If you are familiar with HTML, you’ll find that Leaf is easy to learn & use. I’ll show you some handy tips real quick.
Splitting up templates is going to be essential if you are planning to build a multi-page website. You can create reusable leaf templates as components that you can inline later on.
We are going to update our index template and give an opportunity for other templates to set a custom title & description variable and define a bodyBlock that we can evaluate (or call) inside the index template. Don’t worry, you’ll understand this entire thing when you look at the final code.
<!DOCTYPE html>
<html>
  <head>
    <meta charset="utf-8">
    <meta name="viewport" content="width=device-width, initial-scale=1">
    <title>#(title)</title>
    <meta name="description" content="#(description)">
  </head>
  <body>
    <main>
        #bodyBlock()
    </main>
  </body>
</html>
The example above is a really good starting point. We could render the index template and pass the title & description properties using Swift, of course the bodyBlock would be still missing, but let me show you how can we define that using a different Leaf file called home.html.
#let(description = "This is the description of our home page.")
#define(bodyBlock):
<section class="wrapper">
    <h2>#(header)</h2>
</section>
<section class="wrapper">
    <p>#(message)</p>
</section>
#enddefine
#inline("index")
Our home template starts with a constant declaration using the #let syntax (you can also use #var to define variables), then in the next line we build a new reusable block with a multi-line content. Inside the body we can also print out variables combined with HTML code, every single context variable is also available inside definition blocks. In the very last line we tell the system that it should inline the contents of our index template. This means that we’re literally copy & paste the contents of that file here. Think of it like this:
#let(description = "This is the description of our home page.")
#define(bodyBlock):
<section class="wrapper">
    <h2>#(header)</h2>
</section>
<section class="wrapper">
    <p>#(message)</p>
</section>
#enddefine
<!DOCTYPE html>
<html>
  <head>
    <meta charset="utf-8">
    <meta name="viewport" content="width=device-width, initial-scale=1">
    <title>#(title)</title>
    <meta name="description" content="#(description)">
  </head>
  <body>
    <main>
        #bodyBlock()
    </main>
  </body>
</html>
As you can see we still need values for the title, header and message variables. We don’t have to deal with the bodyBlock anymore, the renderer will evaluate that block and simply replace the contents of the block with the defined body, this is how you can imagine the template before the variable replacement:
#let(description = "This is the description of our home page.")
<!DOCTYPE html>
<html>
  <head>
    <meta charset="utf-8">
    <meta name="viewport" content="width=device-width, initial-scale=1">
    <title>#(title)</title>
    <meta name="description" content="#(description)">
  </head>
  <body>
    <main>
        <section class="wrapper">
            <h2>#(header)</h2>
        </section>
        <section class="wrapper">
            <p>#(message)</p>
        </section>
    </main>
  </body>
</html>
Now that’s not the most accurate representation of how the LeafRenderer works, but I hope that it’ll help you to understand this whole define / evaluate syntax thing.
You can also use the
#evaluatetag instead of calling the block (bodyBlock()vs#evaluate(bodyBlock), these two snippets are essentially the same).
It’s time to render the page template. Again, we don’t have to deal with the bodyBlock, since it’s already defined in the home template, the description value also exists, because we created a new constant using the #let tag. We only have to pass around the title, header and message keys with proper values as context variables for the renderer.
app.get { req in
    req.leaf.render(template: "home", context: [
        "title": "My Page",
        "header": "This is my own page.",
        "message": "Welcome to my page!"
    ])
}
It’s possible to inline multiple Leaf files, so for example you can create a hierarchy of templates such as: index ▸ page ▸ welcome, just follow the same pattern that I introduced above. Worth to mention that you can inline files as raw files (#inline("my-file", as: raw)), but this way they won’t be processed during rendering. 😊
LeafData, loops and conditions
Passing some custom data to the view is not that hard, you just have to conform to the LeafDataRepresentable protocol. Let’s build a new list.html template first, so I can show you a few other practical things as well.
#let(title = "My custom list")
#let(description = "This is the description of our list page.")
#var(heading = nil)
#define(bodyBlock):
<h1>#(heading ?? "Todo list")</h1>
<ul>
#for(todo in todos):
    <li>#if(todo.isCompleted):✅#else:❌#endif #(todo.name)</p></li>
#endfor
</ul>
#enddefine
#inline("index")
We declare two constants so we don’t have to pass around the title and description using the same keys as context variables. Next we use the variable syntax to override our heading and set it to a nil value, we’re doing this so I can show you that we can use the coalescing (??) operator to chain optional values. Next we use the #for block to iterate through our list. The todos variable will be a context variable that we setup using Swift later on. We can also use conditions to check values or expressions, the syntax is pretty much straightforward.
Now we just have to create a data structure to represent our Todo items.
import Vapor
import Leaf

struct Todo {
    let name: String
    let isCompleted: Bool
}

extension Todo: LeafDataRepresentable {

    var leafData: LeafData {
        .dictionary([
            "name": name,
            "isCompleted": isCompleted,
        ])
    }
}
I made a new Todo struct and extended it so it can be used as a LeafData value during the template rendering process. You can extend Fluent models just like this, usually you will have to return a LeafData.dictionary type with your object properties as specific values under given keys. You can extend the dictionary with computed properties, but this is a great way to hide sensitive data from the views. Just completely ignore the password fields. 😅
Time to render a list of todos, this is one possible approach:
func routes(_ app: Application) throws {

    app.get { req -> EventLoopFuture<View> in
        let todos = [
            Todo(name: "Update Leaf 4 articles", isCompleted: true),
            Todo(name: "Write a brand new article", isCompleted: false),
            Todo(name: "Fix a bug", isCompleted: true),
            Todo(name: "Have fun", isCompleted: true),
            Todo(name: "Sleep more", isCompleted: false),
        ]
        return req.leaf.render(template: "list", context: [
            "heading": "Lorem ipsum",
            "todos": .array(todos),
        ])
    }
}
The only difference is that we have to be more explicit about types. This means that we have to tell the Swift compiler that the request handler function returns a generic EventLoopFuture object with an associated View type. The Leaf renderer works asynchronously so that’s why we have to work with a future value here. If you don’t how how they work, please read about them, futures and promises are quite essential building blocks in Vapor.
The very last thing I want to talk about is the context argument. We return a [String: LeafData] type, that’s why we have to put an additional .array initializer around the todos variable so the renderer will know the exact type here. Now if you run the app you should be able to see our todos.
Summary
I hope that this tutorial will help you to build better templates using Leaf. If you understand the basic building blocks, such as inlines, definitions and evaluations, it’s going to be really easy to compose your template hierarchies. If you want to learn more about Leaf or Vapor you should check for more tutorials in the articles section or you can purchase my Practical Server Side Swift book.
