Ultimate UICollectionView guide with iOS examples written in Swift
Learn how to use UICollectionView, with highly reusable UIKit components and some MVVM pattern without the going nuts with index path calculations.
Anatomy of the UICollectionView class
If you’re not familiar with UICollectionView, I’d suggest to get familiar with this class immediately. They’re the basic building blocks for many apps provided by Apple and other third party developers. It’s like UITableView on steroids. Here is a quick intro about how to work with them through IB and Swift code. 💻
You might have noticed that I have a love for metal music. In this tutorial we’re going to build an Apple Music catalog like look from ground zero using only the mighty UICollectionView class. Headers, horizontal and vertical scrolling, circular images, so basically almost everything that you’ll ever need to build great user interfaces. 🤘🏻
How to make a UICollectionView using Interface Builder (IB) in Xcode?
The short & honest answer: you shouldn’t use IB!
If you still want to use IB, here is a real quick tutorial for absolutely beginners:
The main steps of creating your first UICollectionView based screen are these:
- Drag a UICollectionView object to your view controller
- Set proper constraints on the collection view
- Set dataSource & delegate of the collection view
- Prototype your cell layout inside the controller
- Add constraints to your views inside the cell
- Set prototype cell class & reuse identifier
- Do a little coding:
import UIKit

class MyCell: UICollectionViewCell {
    @IBOutlet weak var textLabel: UILabel!
}

class ViewController: UIViewController {

    @IBOutlet weak var collectionView: UICollectionView!

    override func viewDidLayoutSubviews() {
        super.viewDidLayoutSubviews()

        if let flowLayout = collectionView.collectionViewLayout as? UICollectionViewFlowLayout {
            flowLayout.itemSize = CGSize(
                width: collectionView.bounds.width,
                height: 120
            )
        }
    }
}

extension ViewController: UICollectionViewDataSource {

    func numberOfSections(
        in collectionView: UICollectionView
    ) -> Int {
        1
    }

    func collectionView(
        _ collectionView: UICollectionView,
        numberOfItemsInSection section: Int
    ) -> Int {
        10
    }

    func collectionView(
        _ collectionView: UICollectionView,
        cellForItemAt indexPath: IndexPath
    ) -> UICollectionViewCell {
        let cell = collectionView.dequeueReusableCell(
            withReuseIdentifier: "MyCell",
            for: indexPath
        ) as! MyCell

        cell.textLabel.text = String(indexPath.row + 1)
        return cell
    }
}

extension ViewController: UICollectionViewDelegate {

    func collectionView(
        _ collectionView: UICollectionView,
        didSelectItemAt indexPath: IndexPath
    ) {
        print(indexPath.item + 1)
    }
}
In a nutshell, the data source will provide all the required data about how to populate the collection view, and the delegate will handle user events, such as tapping on a cell. You should have a clear understanding about the data source and delegate methods, so feel free to play with them for a little while. ⌨️
How to setup a UICollectionView based screen programmatically?
As you might have noticed cells are the core components of a collection view. They are derived from reusable views, this means that if you have a list of 1000 elements, there won’t be a thousand cells created for every element, but only a few that fills the size of the screen and when you scroll down the list these items are going to be reused to display your elements. This is only because of memory considerations, so unlike UIScrollView the UICollectionView (and UITableView) class is a really smart and efficient one, but this is also the reason why you have to prepare (reset the contents of) the cell every time before you display your actual data. 😉
Initialization is also handled by the system, but it’s worth to mention that if you are working with Interface Builder, you should do your customization inside the awakeFromNib method, but if you are using code, init(frame:) is your place.
import UIKit

class MyCell: UICollectionViewCell {

    weak var textLabel: UILabel!

    override init(frame: CGRect) {
        super.init(frame: frame)

        let textLabel = UILabel(frame: .zero)
        textLabel.translatesAutoresizingMaskIntoConstraints = false
        contentView.addSubview(textLabel)
        NSLayoutConstraint.activate([
            textLabel.topAnchor.constraint(
                equalTo: contentView.topAnchor
            ),
            textLabel.bottomAnchor.constraint(
                equalTo: contentView.bottomAnchor
            ),
            textLabel.leadingAnchor.constraint(
                equalTo: contentView.leadingAnchor
            ),
            textLabel.trailingAnchor.constraint(
                equalTo: contentView.trailingAnchor
            ),
        ])
        self.textLabel = textLabel

        contentView.backgroundColor = .lightGray
        textLabel.textAlignment = .center
    }

    required init?(coder aDecoder: NSCoder) {
        super.init(coder: aDecoder)

        fatalError("Interface Builder is not supported!")
    }

    override func awakeFromNib() {
        super.awakeFromNib()

        fatalError("Interface Builder is not supported!")
    }

    override func prepareForReuse() {
        super.prepareForReuse()

        textLabel.text = nil
    }
}
Next we have to implement the view controller which is responsible for managing the collection view, we’re not using IB so we have to create it manually by using Auto Layout anchors - like for the textLabel in the cell - inside the loadView method. After the view hierarchy is ready to rock, we also set the data source and delegate plus register our cell class for further reuse. Note that this is done automatically by the system if you are using IB, but if you prefer code you have to do it by calling the proper registration method. You can register both nibs and classes.
import UIKit

class ViewController: UIViewController {

    weak var collectionView: UICollectionView!

    override func loadView() {
        super.loadView()

        let collectionView = UICollectionView(
            frame: .zero,
            collectionViewLayout: UICollectionViewFlowLayout()
        )
        collectionView.translatesAutoresizingMaskIntoConstraints = false
        view.addSubview(collectionView)
        NSLayoutConstraint.activate([
            collectionView.topAnchor.constraint(
                equalTo: view.topAnchor
            ),
            collectionView.bottomAnchor.constraint(
                equalTo: view.bottomAnchor
            ),
            collectionView.leadingAnchor.constraint(
                equalTo: view.leadingAnchor
            ),
            collectionView.trailingAnchor.constraint(
                equalTo: view.trailingAnchor
            ),
        ])
        self.collectionView = collectionView
    }

    override func viewDidLoad() {
        super.viewDidLoad()

        collectionView.backgroundColor = .white
        collectionView.dataSource = self
        collectionView.delegate = self
        collectionView.register(
            MyCell.self,
            forCellWithReuseIdentifier: "MyCell"
        )
    }
}

extension ViewController: UICollectionViewDataSource {

    func numberOfSections(
        in collectionView: UICollectionView
    ) -> Int {
        1
    }

    func collectionView(
        _ collectionView: UICollectionView,
        numberOfItemsInSection section: Int
    ) -> Int {
        10
    }

    func collectionView(
        _ collectionView: UICollectionView,
        cellForItemAt indexPath: IndexPath
    ) -> UICollectionViewCell {
        let cell = collectionView.dequeueReusableCell(
            withReuseIdentifier: "MyCell",
            for: indexPath
        ) as! MyCell

        cell.textLabel.text = String(indexPath.row + 1)
        return cell
    }
}

extension ViewController: UICollectionViewDelegate {

    func collectionView(
        _ collectionView: UICollectionView,
        didSelectItemAt indexPath: IndexPath
    ) {
        print(indexPath.row + 1)
    }
}

extension ViewController: UICollectionViewDelegateFlowLayout {

    func collectionView(
        _ collectionView: UICollectionView,
        layout collectionViewLayout: UICollectionViewLayout,
        sizeForItemAt indexPath: IndexPath
    ) -> CGSize {
        .init(
            width: collectionView.bounds.size.width - 16,
            height: 120
        )
    }
    func collectionView(
        _ collectionView: UICollectionView,
        layout collectionViewLayout: UICollectionViewLayout,
        minimumLineSpacingForSectionAt section: Int
    ) -> CGFloat {
        8
    }

    func collectionView(
        _ collectionView: UICollectionView,
        layout collectionViewLayout: UICollectionViewLayout,
        minimumInteritemSpacingForSectionAt section: Int
    ) -> CGFloat {
        0
    }

    func collectionView(
        _ collectionView: UICollectionView,
        layout collectionViewLayout: UICollectionViewLayout,
        insetForSectionAt section: Int
    ) -> UIEdgeInsets {
        .init(top: 8, left: 8, bottom: 8, right: 8)
    }
}
This time you should pay some attention on the flow layout delegate methods. You can use these methods to provide metrics for the layout system. The flow layout will display all the cells based on these numbers and sizes. sizeForItemAt is responsible for the cell size, minimumInteritemSpacingForSectionAt is the horizontal padding, minimumLineSpacingForSectionAt is the vertical padding, and insetForSectionAt is for the margin of the collection view section.
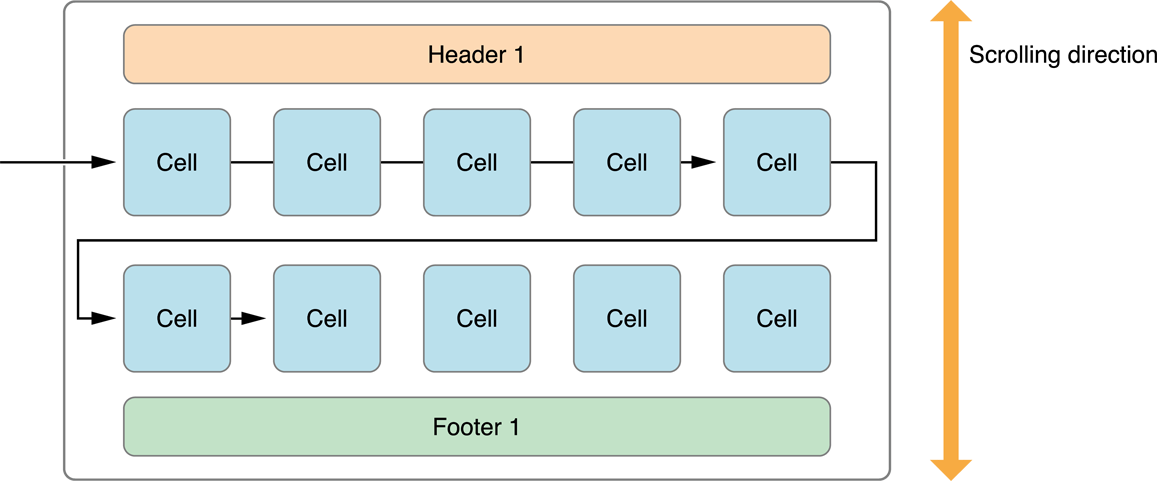
Using supplementary elements (section headers and footers)
So in this section I’m going to both use storyboards, nibs and some Swift code. This is my usual approach for a few reasons. Although I love making constraints from code, most people prefer visual editors, so all the cells are created inside nibs. Why nibs? Because if you have multiple collection views this is “almost” the only nice way to share cells between them.
You can create section footers exactly the same way as you do headers, so that’s why this time I’m only going to focus on headers, because literally you only have to change one word in order to use footers. ⚽️
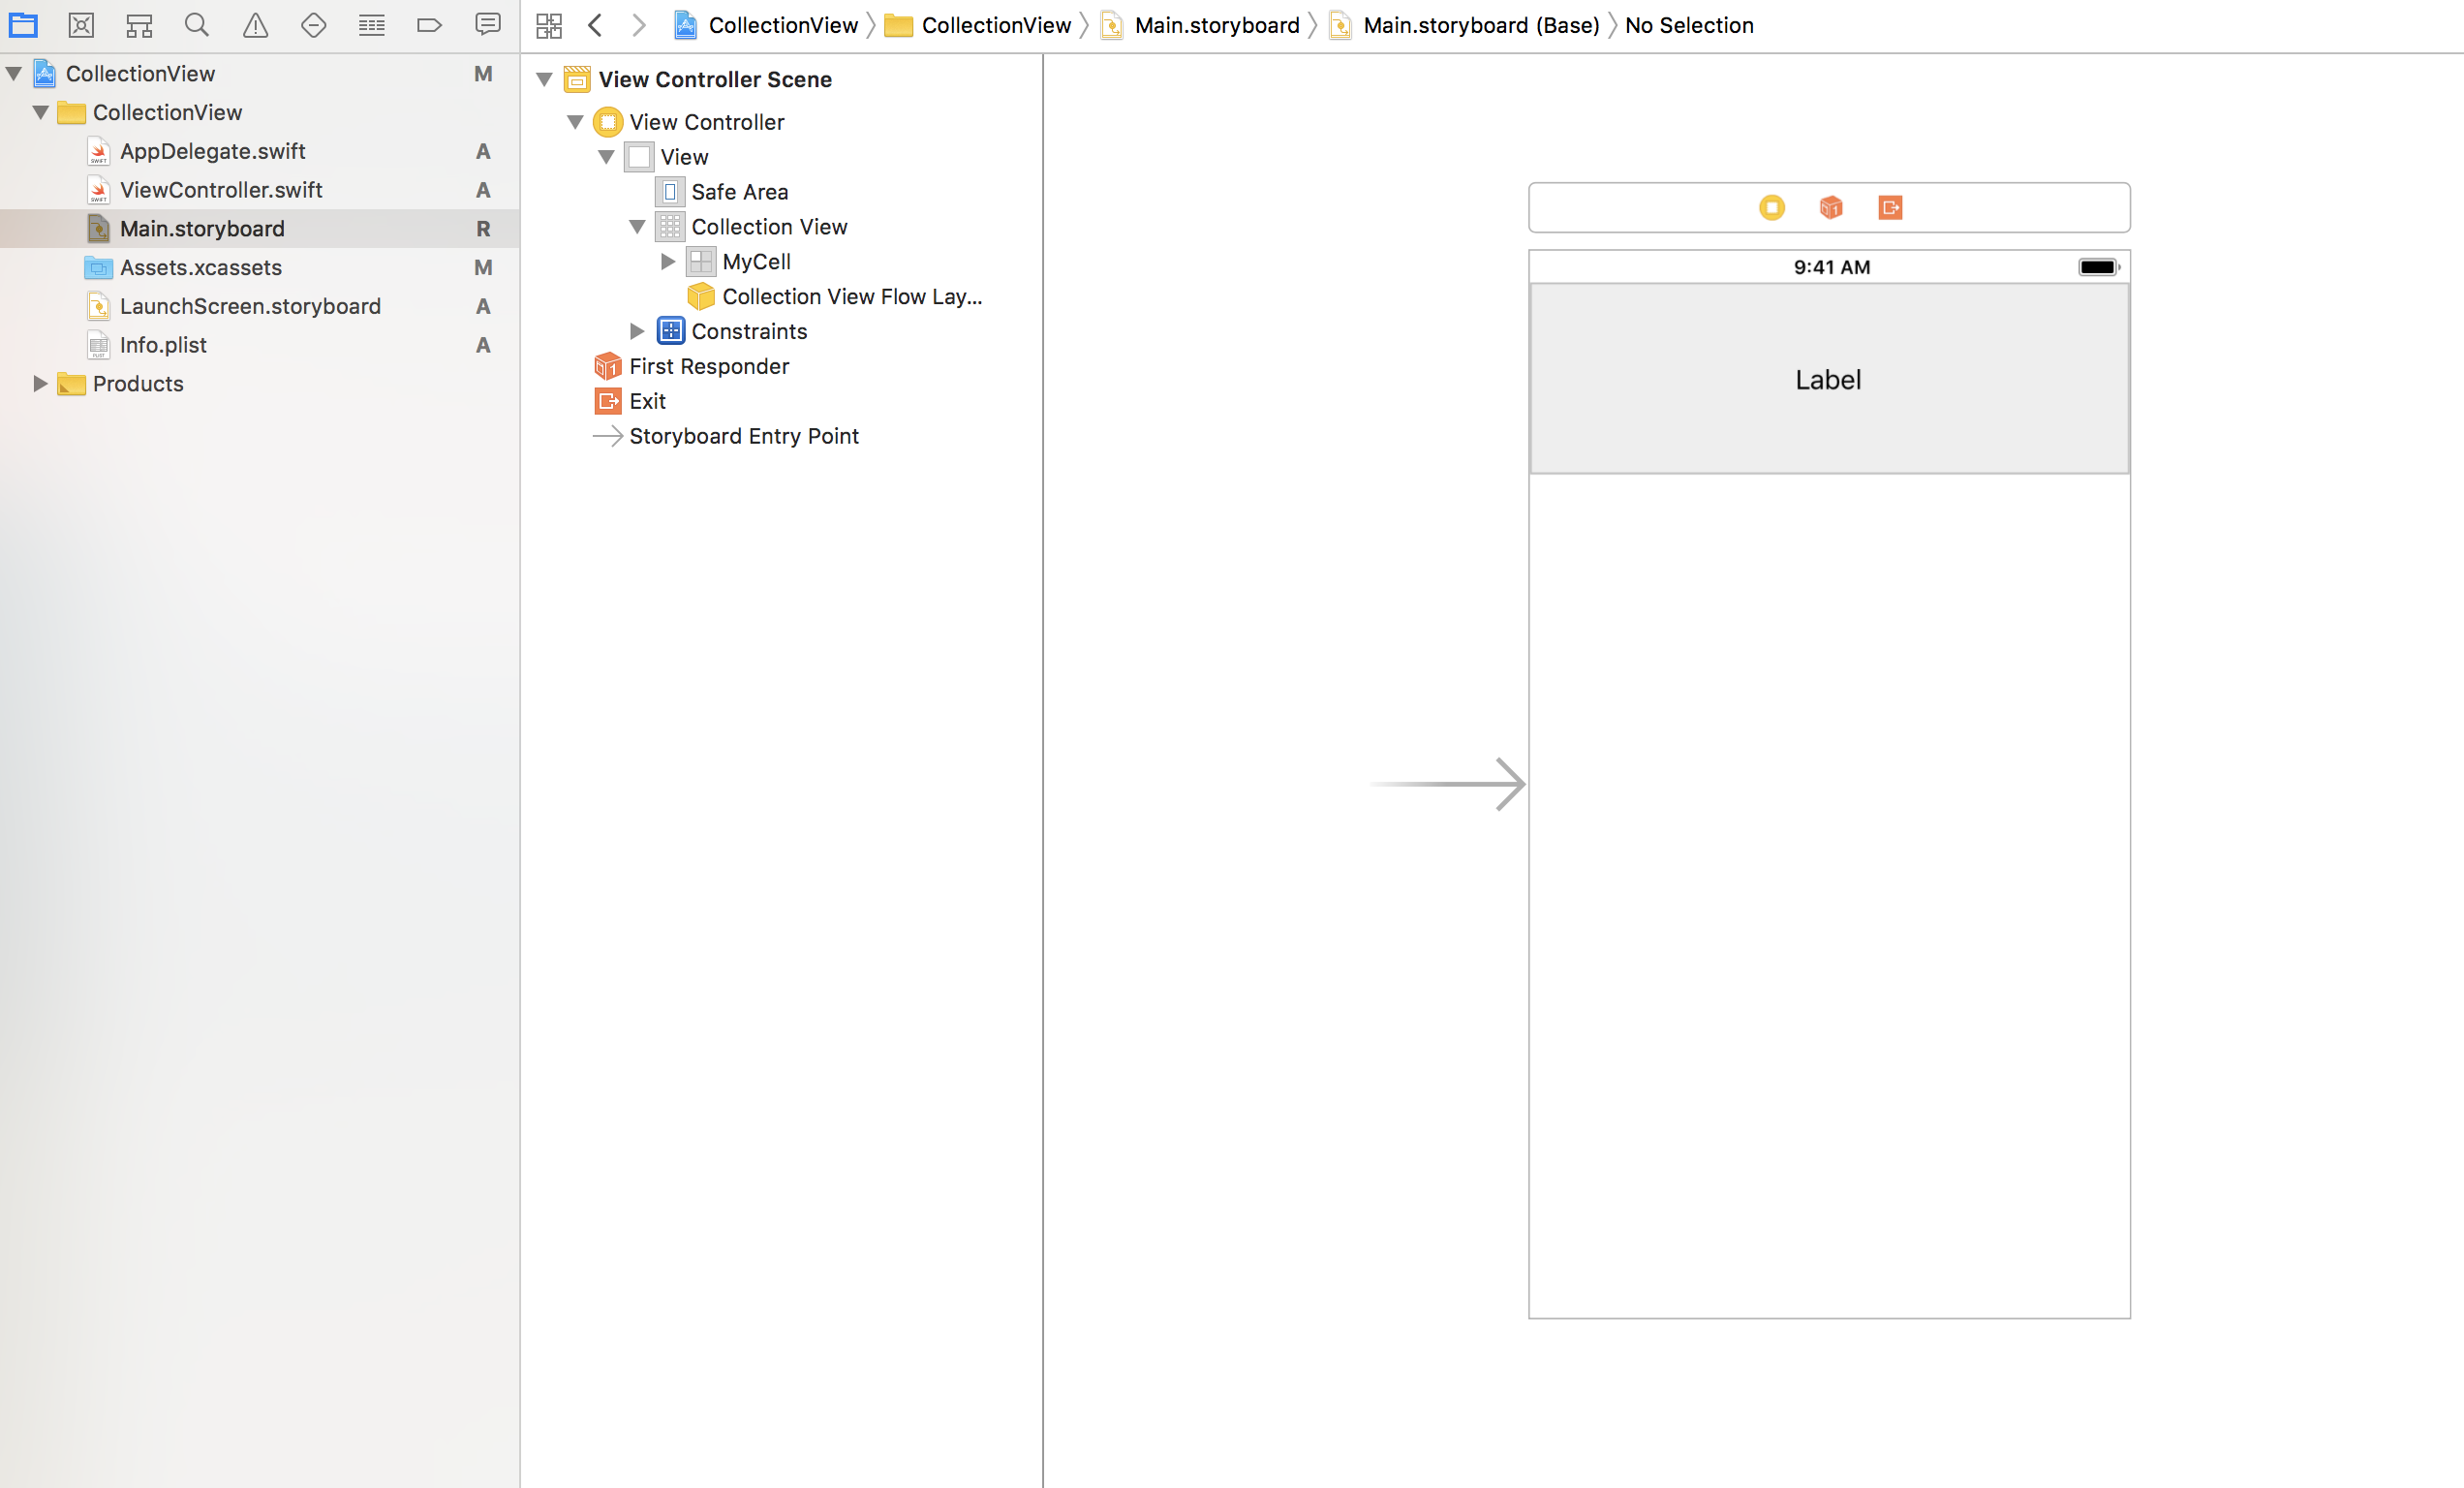
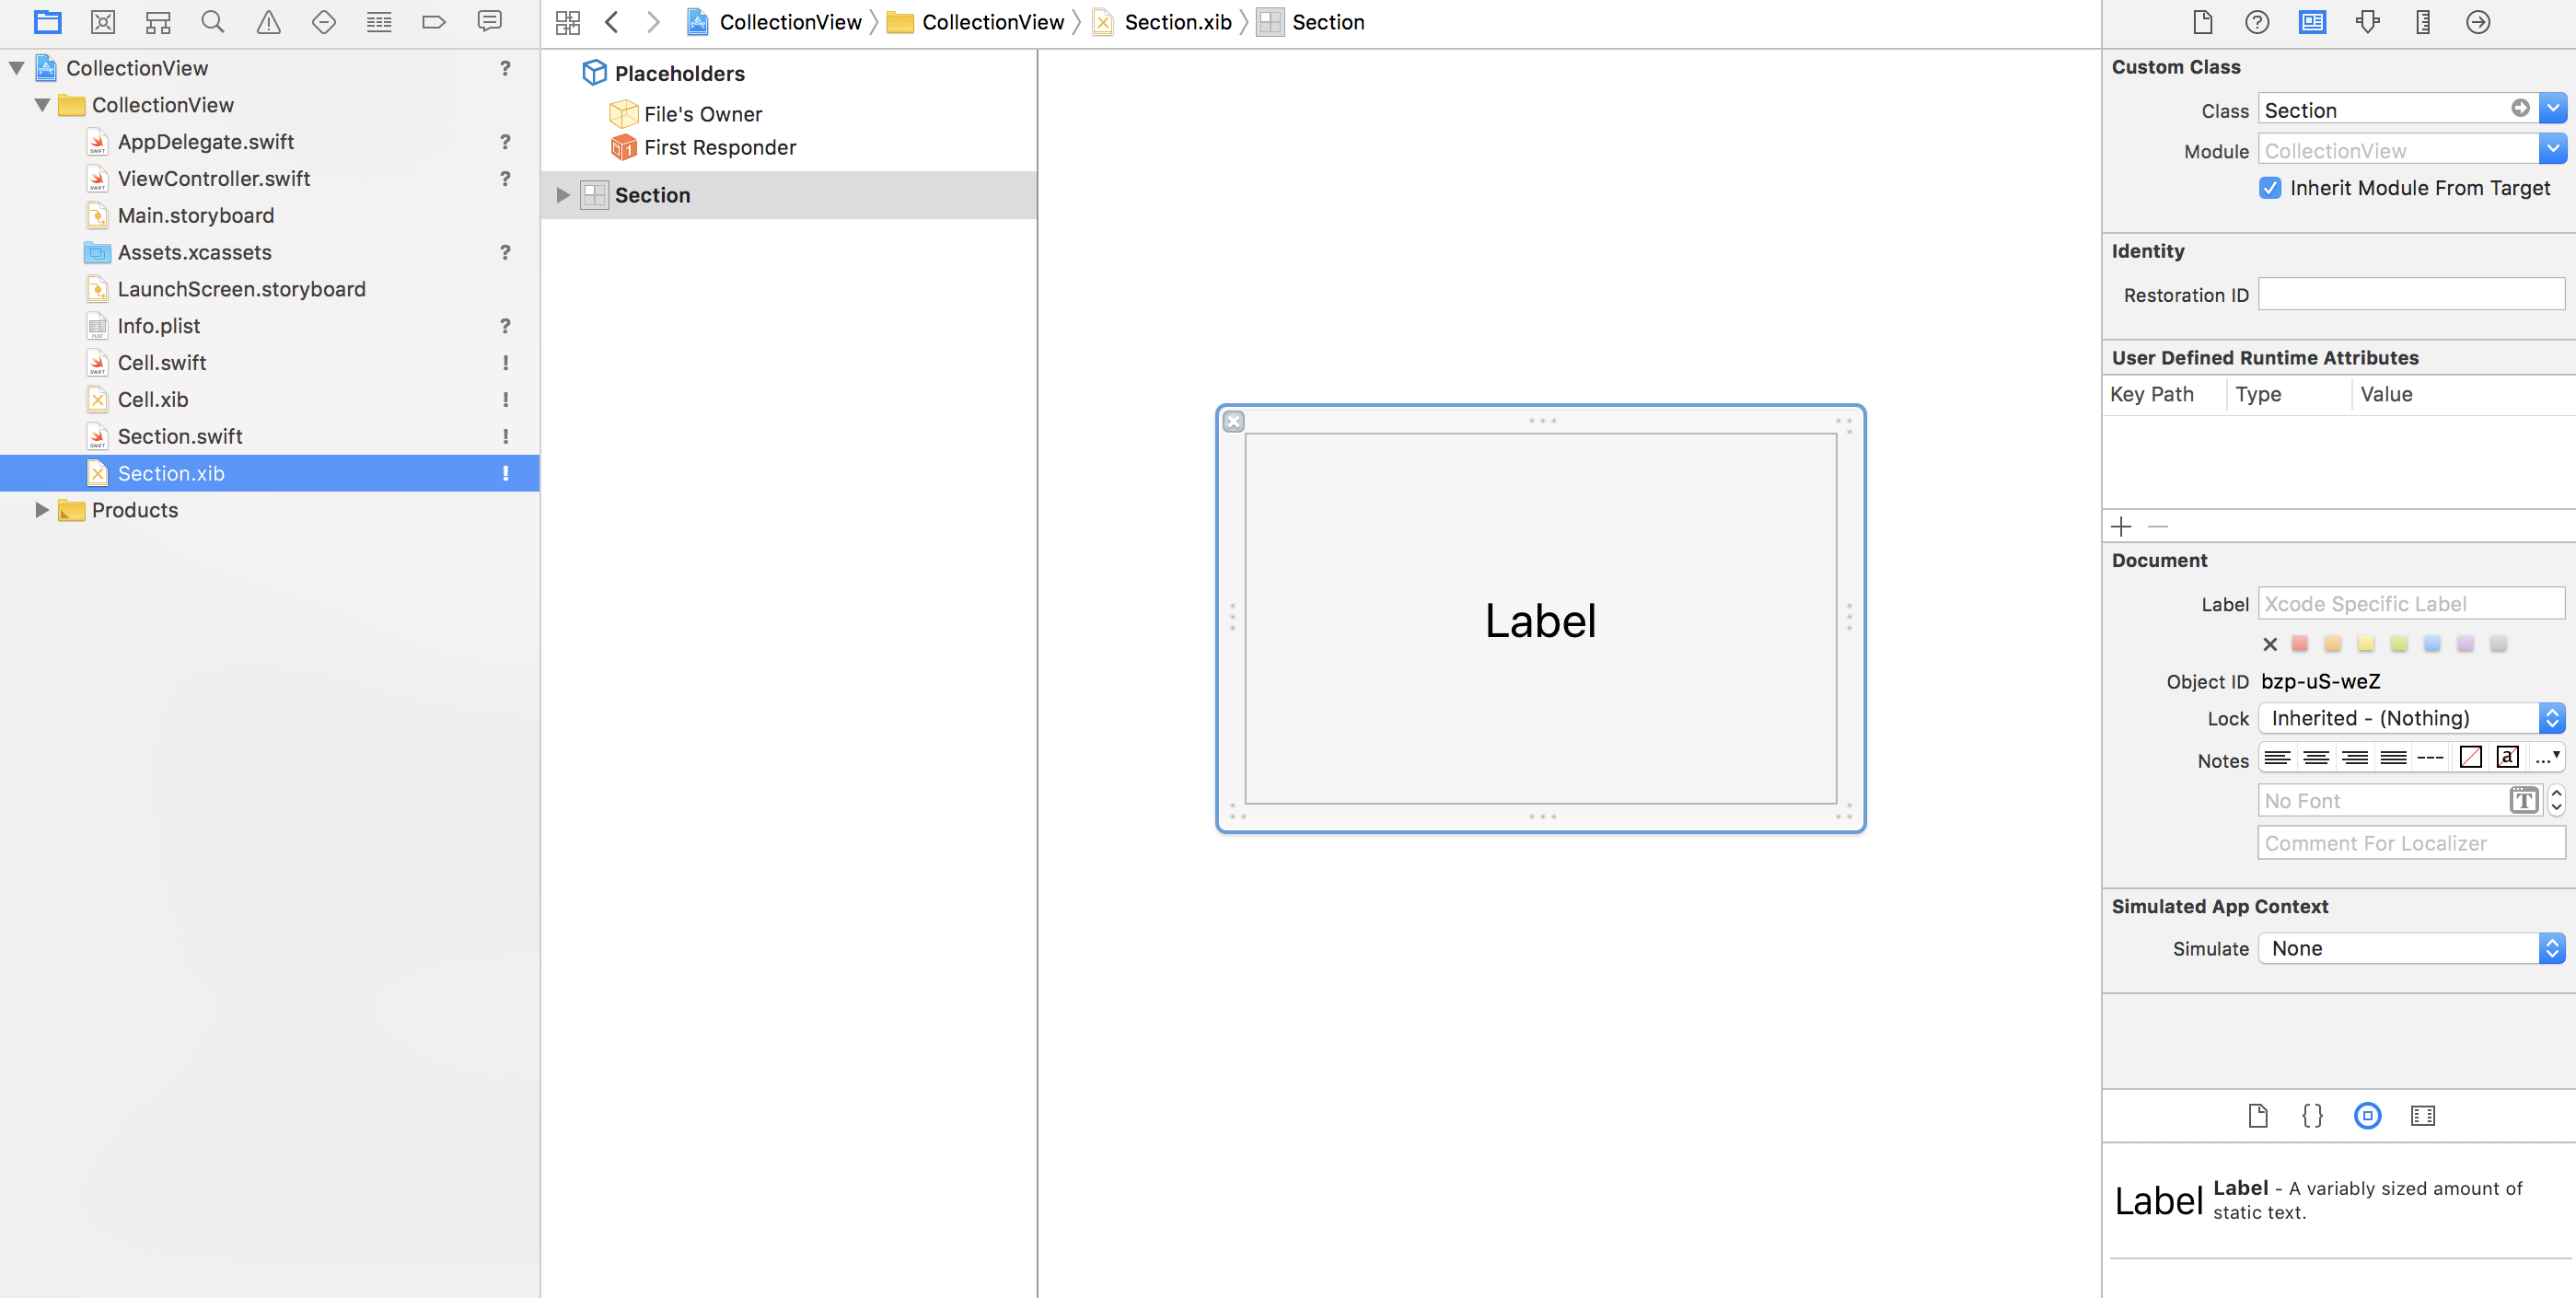
You just have to create two xib files, one for the cell and one for the header. Please note that you could use the exact same collection view cell to display content in the section header, but this is a demo so let’s just go with two distinct items. You don’t even have to set the reuse identifier from IB, because we have to register our reusable views inside the source code, so just set the cell class and connect your outlets.
Cell and supplementary element registration is slightly different for nibs.
let cellNib = UINib(nibName: "Cell", bundle: nil)
self.collectionView.register(
    cellNib,
    forCellWithReuseIdentifier: "Cell"
)

let sectionNib = UINib(nibName: "Section", bundle: nil)
self.collectionView.register(
    sectionNib,
    forSupplementaryViewOfKind: UICollectionView.elementKindSectionHeader,
    withReuseIdentifier: "Section"
)
Implementing the data source for the section header looks like this.
func collectionView(
    _ collectionView: UICollectionView,
    viewForSupplementaryElementOfKind kind: String,
    at indexPath: IndexPath
) -> UICollectionReusableView {

    guard kind == UICollectionView.elementKindSectionHeader else {
        return UICollectionReusableView()
    }
    let view = collectionView.dequeueReusableSupplementaryView(
        ofKind: kind,
        withReuseIdentifier: "Section",
        for: indexPath
    ) as! Section

    view.textLabel.text = String(indexPath.section + 1)
    return view
}
Providing the size for the flow layout delegate is also pretty straightforward, however sometimes I don’t really get the naming conventions by Apple. Once you have to switch a kind, and the other time there are exact methods for specific kinds. 🤷♂️
func collectionView(
    _ collectionView: UICollectionView,
    layout collectionViewLayout: UICollectionViewLayout,
    referenceSizeForHeaderInSection section: Int
) -> CGSize {
    .init(
        width: collectionView.bounds.size.width,
        height: 64
    )
}
Starting from iOS9 section headers and footers can be pinned to the top or bottom of the visible bounds of the collection view.
if let flowLayout = self.collectionView.collectionViewLayout as? UICollectionViewFlowLayout {
    flowLayout.sectionHeadersPinToVisibleBounds = true
}
That’s it, now you know how to build basic layouts with collection view.
What about complex cases, like using multiple kinds of cells in the same collection view? Things can get pretty messy with index paths, so that’s why I re-invented something better based on a technique how to build advanced user interfaces with collection views showcased by Apple back at WWDC 2014.
My CollectionView based UI framework
Now you know the basics, so why don’t we get straight to the point? I’ll show you my best practice of building great user interfaces by using my MVVM architecture based CollectionView micro framework.
CollectionView + ViewModel pattern = ❤️ .
I’ll explain the components real quick and after that you’ll learn how to use them to build up the Apple music-ish layout that I was talking about in the beginning. 🎶
Grid system
The first problem with collection views is the size calculation. You have to provide the size (width & height) for each cell inside your collection view.
- if everything has a fixed size inside your collection view, you can just set the size properties on the flow layout itself
- if you need dynamic sizes per item, you can implement the flow layout delegate aka. UICollectionViewDelegateFlowLayout (why is the delegate word in the middle of the name???) and return the exact sizes for the layout system
- if you need even more control you can create a new layout subclass derived from CollectionView(Flow)Layout and do all the size calculations there
Thats good, but still you have to mess with index paths, trait collections, frames and many more in order to have a simple 2, 4, n column layout that adapts on every device. This is the reason why I’ve created a really basic grid system for size calculation. With my grid class you can just set the number of columns and get back the size for x amount of columns, “just like” in web based css grid systems. 🕸
Cell reuse
Registering and reusing cells should and can be automated in a type safe manner. You just want to use the cell, and you shouldn’t care about reuse identifiers and cell registration at all. I’ve made a couple helper methods in order to make the progress more pleasant. Reuse identifiers are derived from the name of the cell classes, so you dont’t have to worry about anymore. This is a practice that most of the developers use.
View model
view model = cell (view) + data (model)
Filling up “template” cell with real data should be the task of a view model. This is where MVVM comes into play. I’ve made a generic base view model class, that you should subclass. With the help of a protocol, you can use various cells in a single collection view without going crazy of the row & section calculations and you can focus on one simple task: connecting view with models. 😛
Section
section = header + footer + cells
I’m trying to emphasize that you don’t want to mess with index paths, you just want to put your data together and that’s it. In the past I’ve struggled more than enough with “unnecessary index path math”, so I’ve made the section object as a simple container to wrap headers, footers and all the items inside of the section. The result? Generic data source class that can be used with multiple cells without any row or section index calculations. 👏👏👏
Source
So in order to make all the things I’ve mentioned above work, I needed to implement the collection view delegate, data source, and flow layout delegate methods. That’s how my source class was born. Everything is implemented here, and I’m using sections, view models the grid system to build up collection views. But hey, enough from this theory, let’s see it in practice. 👓
CollectionView framework example application
How to make a any list or grid layout hassle free? Well, as a first step just add my CollectionView framework as a dependency. Don’t worry you won’t regret it, plus it supports Xcode 11 already, so you can use the Swift Package Manager, straight from the file menu to integrate this package.
Tip: just add the @_exported import CollectionView line in the AppDelegate file, then you I don’t have to worry about importing the framework file-by-file.
Step 1. Make the cell.
This step is identical with the regular setup, except that your cell have to be a subclass of my Cell class. Add your own cell and do everything as you would do normally.
import UIKit

class AlbumCell: Cell {

    @IBOutlet weak var textLabel: UILabel!
    @IBOutlet weak var detailTextLabel: UILabel!
    @IBOutlet weak var imageView: UIImageView!

    override func awakeFromNib() {
        super.awakeFromNib()

        self.textLabel.font = UIFont.systemFont(ofSize: 12, weight: .bold)
        self.textLabel.textColor = .black

        self.detailTextLabel.font = UIFont.systemFont(ofSize: 12, weight: .bold)
        self.detailTextLabel.textColor = .darkGray

        self.imageView.layer.cornerRadius = 8
        self.imageView.layer.masksToBounds = true
    }

    override func reset() {
        super.reset()

        self.textLabel.text = nil
        self.detailTextLabel.text = nil
        self.imageView.image = nil
    }
}
Step 2. Make a model
Just pick a model object. It can be anything, but my approach is to make a new struct or class with a Model suffix. This way I know that models are referencing the collection view models inside my reusable components folder.
import Foundation

struct AlbumModel {
    let artist: String
    let name: String
    let image: String
}
Step 3. Make the view model.
Now instead of configuring the cell inside the delegate, or in a configure method somewhere, let’s make a real view model for the cell & the data model that’s going to be represented via the view.
import UIKit

class AlbumViewModel: ViewModel<AlbumCell, AlbumModel> {

    override func updateView() {
        self.view?.textLabel.text = self.model.artist
        self.view?.detailTextLabel.text = self.model.name
        self.view?.imageView.image = UIImage(named: self.model.image)
    }

    override func size(grid: Grid) -> CGSize {
        if
            (self.collectionView.traitCollection.userInterfaceIdiom == .phone &&
             self.collectionView.traitCollection.verticalSizeClass == .compact) ||
            self.collectionView?.traitCollection.userInterfaceIdiom == .pad
        {
            return grid.size(
                for: self.collectionView,
                ratio: 1.2,
                items: grid.columns / 4,
                gaps: grid.columns - 1
            )
        }
        if grid.columns == 1 {
            return grid.size(for: self.collectionView, ratio: 1.1)
        }
        return grid.size(
            for: self.collectionView,
            ratio: 1.2,
            items: grid.columns / 2,
            gaps: grid.columns - 1
        )
    }
}
Step 4. Setup your data source.
Now, use your real data and populate your collection view using the view models.
let grid = Grid(columns: 1, margin: UIEdgeInsets(all: 8))
self.collectionView.source = .init(grid: grid, [
    [
        HeaderViewModel(.init(title: "Albums"))
        AlbumViewModel(self.album)
    ],
])
self.collectionView.reloadData()
Step 5. 🍺🤘🏻🎸
Congratulations you’re done with your first collection view. With just a few lines of code you have a ROCK SOLID code that will help you out in most of the situations! 😎
This is just the tip of the iceberg! 🚢
Horizontal scrolling inside vertical scrolling
What if we make a cell that contains a collection view and we use the same method like above? A collection view containing a collection view… UICollectionViewception!!! 😂
It’s completely possible, and really easy to do, the data that feeds the view model will be a collection view source object, and you’re done. Effortless, magical and super nice to implement, also included in the example app.
Sections with artists & circular images
Multiple sections? No problem, circular images? That’s also a piece of cake, if you had read my previous tutorial about circular collection view cells, you’ll know how to do it, but please check out the source code from GitLab and see it for yourself in action.
Callbacks and actions
User events can be handled very easy, because view models can have delegates or callback blocks, it only depends on you which one you prefer. The example contains an onSelect handler, which is super nice and built-in to the framework. 😎
Dynamic cell sizing re-imagined
I also had a tutorial about collection view self sizing cell support, but to be honest I’m not a big fan of Apple’s official method. After I’ve made the grid system and started using view models, it was more easy to calculate cell heights by myself, with about 2 lines of extra code. I believe that’s worth it, because self sizing cells are a little buggy if it comes to auto rotation.
Rotation support, adaptivity
Don’t worry about that too much, you can simply change the grid or check trait collections inside the view model if you want. I’d say almost everything can be done right out of the box. My collection view micro framework is just a lightweight wrapper around the official collection view APIs. That’s the beauty of it, feel free to do whatever you want and use it in a way that YOU personally prefer. 📦
Now go, grab the sample code and listen to some metal! 🤘🏻
What if I told you… one more thing: SwiftUI
These are some original quotes of mine back from April, 2018:
If you like this method that’s cool, but what if I told you that there is more? Do you want to use the same pattern everywhere? I mean on iOS, tvOS, macOS and even watchOS. Done deal! I’ve created everything inside the CoreKit framework. UITableViews, WKInterfaceTables are supported as well.
Well, I’m a visionary, but SwiftUI was late 1 year, it arrived in 2019:
I really believe that Apple this year will approach the next generation UIKit / AppKit / UXKit frameworks (written in Swift of course) somewhat like this. I’m not talking about the view model pattern, but about the same API on every platform thinking. Anyway, who knows this for sue, we’ll see… #wwdc18 🤔
If someone from Apple reads this, please explain me why the hell is SwiftUI still an abstraction layer above UIKit/ AppKit instead of a refactored AppleKit UI framework that finally unifies every single API? For real, why? Still don’t get it. 🤷♂️
Anyway, we’re going in to the same direction guys, year-by-year I delete more and more self-written “3rd-party” code, so you’re doing great progress there! 🍎
Related posts

10 little UIKit tips you should know
In this article I've gathered my top 10 favorite modern UIKit tips that I'd definitely want to know before I start my next project.
Building input forms for iOS apps
Learn how to build complex forms with my updated collection view view-model framework without the struggle using Swift.
Custom UIView subclass from a xib file
Do you want to learn how to load a xib file to create a custom view object? Well, this UIKit tutorial is just for you written in Swift.
Custom views, input forms and mistakes
Just a little advice about creating custom view programmatically and the truth about why form building with collection views sucks.
