Getting started with SwiftIO
SwiftIO is an electronic circuit board that runs Swift on the bare metal. It can control sensors, displays, lights, motors and more.
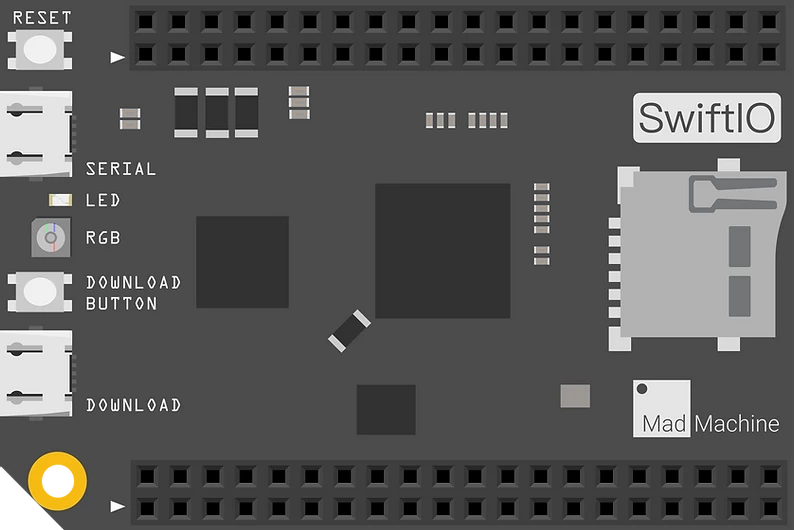
The SwiftIO board
MadMachine’s SwiftIO board is an Arduino-like system, but it can run Swift code natively on the hardware. Swift is a great programming language for education purposes, it is a modern language with a JavaScript-like syntax that is easy to learn and understand. Swift is safe and efficient, this combination makes it a perfect candidate for embedded systems. The SwiftIO board enables us regular Swift / iOS developers to build IoT projects using our favorite programming language.
The board itself has a small footprint, it’s just about 1,57” x 2,36” (4cm x 6cm) big.
It’s quite a powerful microcontroller. It is definitely the most affordable Swift language learning device. It can be ideal for STEM education purposes for students who want to see how to build electronic circuits and get some basic Swift programming skills at the same time.
The Maker Kit box contains both a 7 segment and an LCD display, a servo and a DC motor with drivers, a humiture (temperature & humidity) sensor, a buzzer module a potentiometer and a light sensor and many more other things (breadboard, resistors, LEDs, buttons and cables, etc.) that you can use to build the starter projects. You will have pretty much everything in the box that you need as a newcomer to get started and have some fun time using SwiftIO. 📦
Unfortunately you won’t find a working GPS, WiFi or Bluetooth module for the SwiftIO board yet, but hopefully these kind of accessories are just a few months away. There is a new shield and a brand new screen module in the works. Oh by the way a shield is something that you can plug into your board and connect external accessories using “special” colorful cables. 🌈
Shields are boards that can be plugged on top of the Arduino PCB extending its capabilities. The different shields follow the same philosophy as the original toolkit: they are easy to mount, and cheap to produce. - ArduinoShields
The board initially went on sale in July, 2020 and many people brought it from all around the world. New plug-ins, extensions and modules are still being developed by the makers, but it is important to emphasize that the SwiftIO board hardware is in a stable state. 💪
Technical specifications:
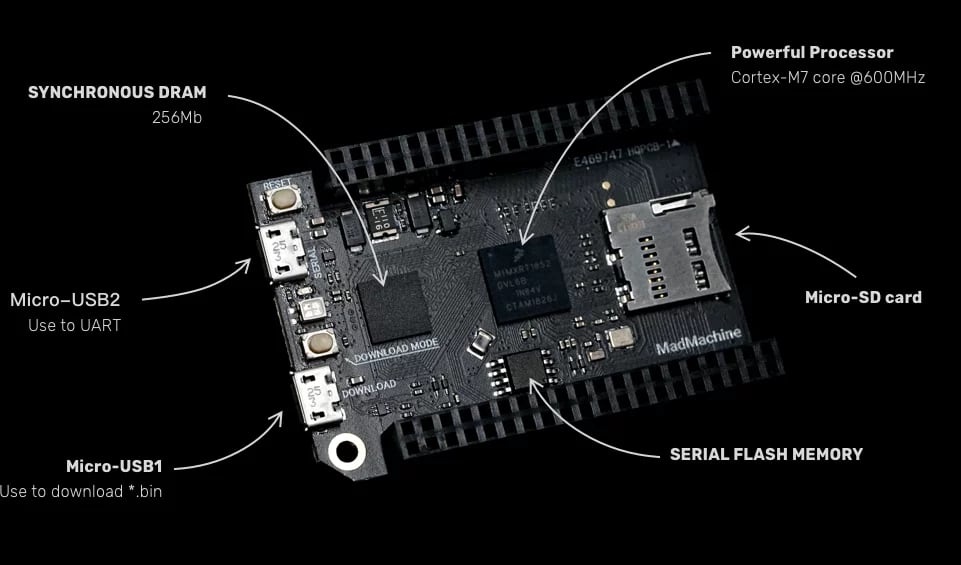
- i.MX RT1052 Crossover Processor with Arm® Cortex®-M7 core @600MHz
- Micro SD card slot, supporting standard and high capacity SD cards
- Micro USB connector for power
- On-board USB to UART for serial communication
- 46 GPIO on left and right edges
- On-board GRB LED
- 12x 12-bit analog to digital (ADC) converters
- 4 UART, 2 CAN, 2 IIC, and 2 SPI
- 14 PWM pins
- Many additional advanced features to meet the needs of advanced users
Ports, communication, architecture
You can connect the SwiftIO board to your computer via a USB connector, the two devices can communicate through a serial port. The USB cable will provide the necessary power support, but alternatively you can use an adapter or an external battery through a shield.
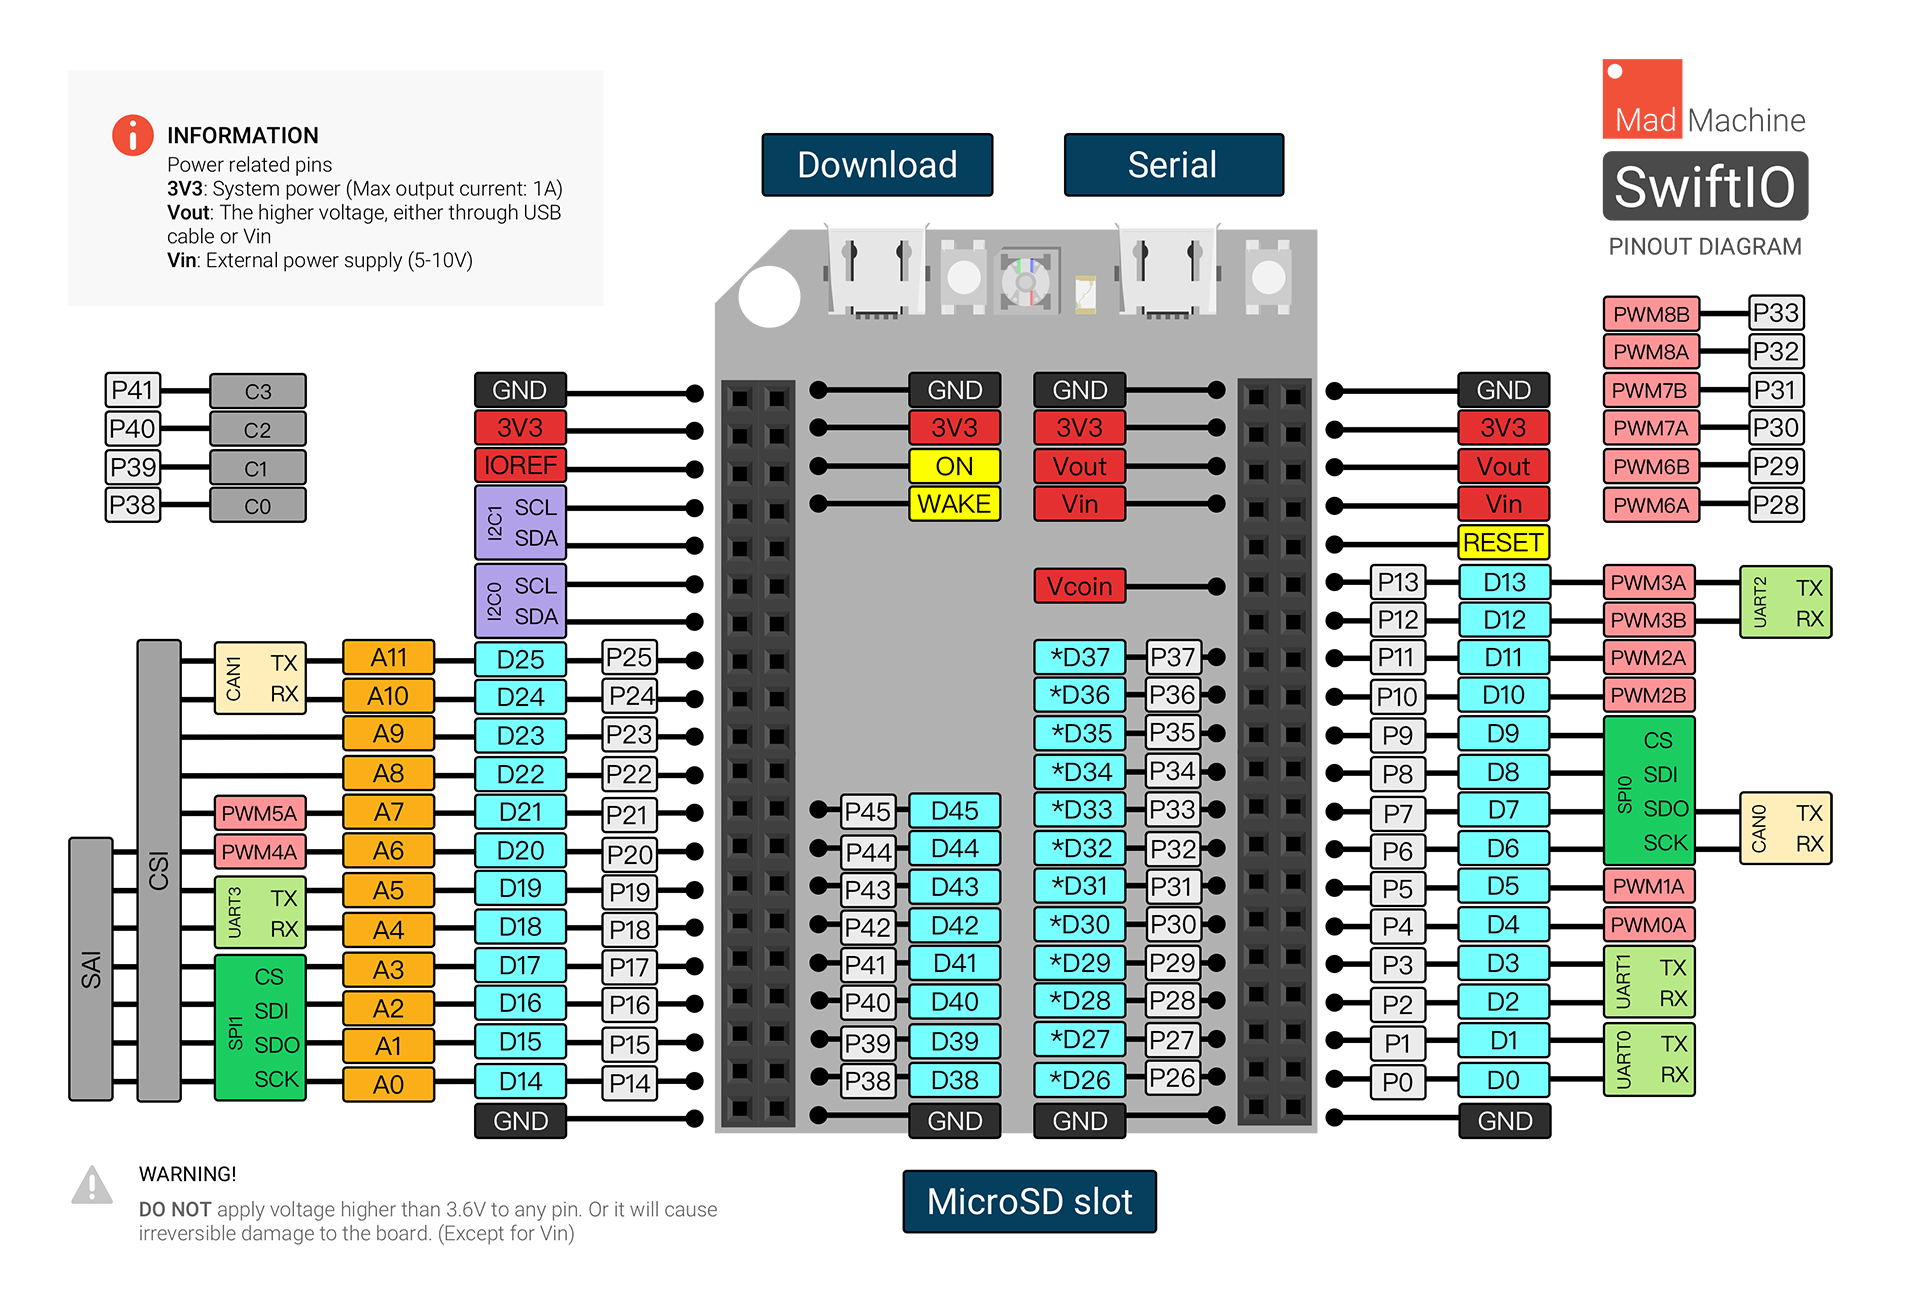
You can wire up additional components using the General Purpose Input/Output pins (GPIO). You can see the exact specification on the picture above, but honestly I barely understand this diagram.
Confession time: I don’t know shit about electronics (yet). 💩
The board can be used with a shield and fortunately the MakersKit arrives with a handy instruction manual for absolute beginners. I felt lucky, because I was able to approach this little gadget with my programmer mindset and I could focus more on Swift instead of building working circuits.
So what’s actually under the hood? How can I build & run applications for SwiftIO?
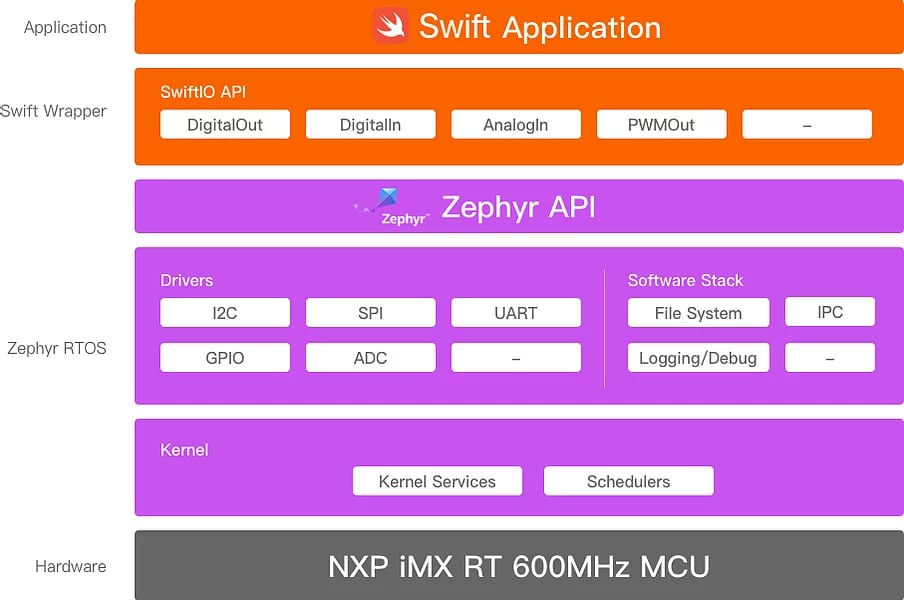
The gray area is the hardware itself, on top of that in the pink-ish/purple boxes there is this Zephyr layer which I’ve never heard before. I’m just scratching the surface here, but that’s fine, since as a Swift developer we only care about the orange stuff. Long story short, there is a custom built Swift toolchain for this device that allows us to build and run Swift applications on the board. 😅
If there is a toolchain, then we can run Swift binaries, but how do we communicate with the ports and stuff like that? Fortunately the SwiftIO framework is here for us. It provides an easy access to communicate with external hardware accessories. You can read or write digital and analog signals using the communication protocol. Are you ready for some Swift code?
The SwiftIO environment
Although the hardware is stable, the software is not finished yet. There are two options available, but if you are on a Windows machine, you should grab the official MadMachine IDE and use that. The reason is that the Swift Package Manager is not ready for that platform yet, so you won’t be able to work with the tools that I’ll show you next. Sorry Windows, no offense. 😅
So option A, is to go with the IDE, it’s really easy to use and provides a great DX. Option B, learn a bit more about the underlying toolkit and follow my guide, it’s a bit more complicated, but you’ll know more about the technical infrastructure if you choose this path. 🤔
Installing the MadMachine SDK & CLI
As a macOS or Linux user you should know that you can install the unofficial MadMachine SDK alongside a command line tool called mm. As you can see this MadMachine SDK is written in Swift, but you should know that I ported a python script from the original mm-sdk project with the help of Marcus Kida. First, he made an Xcode template by invoking the original script inside the official MadMachine IDE, then I thought, it would be cool to get rid of the IDE for good, and now, here we go, we have a standalone Swift version of the necessary build tools. You can install it like this:
git clone https://github.com/EmbeddedSwift/MadMachine.git
cd MadMachine
make install
Now you should be ready to use the mm cli app, you can check the available commands inside the README file on GitHub. I have not tested this on Linux yet, so if you find any issues, please don’t hesitate to report or submit a PR. This is an experimental project, so keep this in mind. 😅
The MadMachine toolchain
In order to use the MadMachine SDK you will need a working toolchain installed on your computer. You can grab the latest one by running the following command:
mm toolchain --upgrade
This will grab the latest release from the unofficial MadMachine toolchain repository, and place it under your home folder inside the .MadMachine directory. There is one additional thing that now you have to do before you could start building SwiftIO apps. Currently there is one extra python script that was not ported yet, because it will be completely eliminated in the future. For now you still have to download the official MadMachine SDK from the GitHub releases page and place the entire contents of the mm-sdk/tools_[platform]/scripts/dist/gen_isr_tables folder into the ~/.MadMachine/legacy directory. You might have to create a legacy folder. 🙈
The SwiftIO framework
The SwiftIO framework is going to be linked with the application binary, we have to install it (with the help of the mm-cli tool) as a system library first. There’s an unofficial repo with a makefile for this:
git clone https://github.com/EmbeddedSwift/SwiftIO
cd SwiftIO
make install
You can find the library reference for the SwiftIO framework, but we’ll see you can make it work, in just a few moments. Before we go further you should note that the custom MadMachine toolchain is a modified version of the Swift 5.1 toolchain. This means that you can’t use Swift 5.3 on the board yet, but hopefully the creators of SwiftIO will release new software components real soon. 🤞
Using Xcode
The SwiftIO framework can be compiled on your local machine with the local Swift toolchain (using Xcode), so it is possible to build applications without targeting the board, and later on you can re-compile the source files with the mm-cli command, sign the final binary and deploy it to the SwiftIO board after you’ve pressed the download button. This is the current workflow in a nutshell.
There is an existing Xcode template created by @kidmar that you can use as a starting point.
Using SPM
Nowadays I prefer to create a Swift package for almost everything. You can use SPM with a Makefile and your favorite editor to create SwiftIO apps. You just have to initialize a new executable package with the necessary dependencies, for example:
// swift-tools-version:5.3
import PackageDescription

let package = Package(
    name: "myProject",
    products: [
        .executable(name: "myProject", targets: ["myProject"]),
    ],
    dependencies: [
        .package(url: "https://github.com/EmbeddedSwift/SwiftIO", .branch("main")),
        .package(url: "https://github.com/EmbeddedSwift/SHT3x", .branch("main")),
        .package(url: "https://github.com/EmbeddedSwift/LCD1602", .branch("main")),
    ],
    targets: [
        .target(name: "myProject", dependencies: [
            .product(name: "SwiftIO", package: "SwiftIO"),
            .product(name: "SHT3x", package: "SHT3x"),
            .product(name: "LCD1602", package: "LCD1602"),
        ]),
    ]
)
Inside the main.swift file now you can write a simple Humiture sensor app that displays the current humidity & temperature on a 16x2 LCD display like this:
import SwiftIO
import SHT3x
import LCD1602

// Get a number with one decimal place.
extension Float {
    func format(_ f: Int) -> Float {
        guard f > 0 else {return self}
        var mul = 10
        for _ in 1..<f {
            mul *= 10
        }
        let data = Int(self * Float(mul))
        return Float(data) / Float(mul)
    }
}

// Initialize the LCD and sensor to use the I2C communication.
let i2c = I2C(Id.I2C0)
let lcd = LCD1602(i2c)
let sht = SHT3x(i2c)

while true{
    // Read and display the temperature on the LCD and update the value every 1s.
    let temp = sht.readTemperature()
    lcd.write(x: 0, y: 0, "Temperature:")
    lcd.write(x: 0, y: 1, String(temp.format(1)))
    lcd.write(x: 4, y: 1, " ")
    lcd.write(x: 5, y: 1, "C")
    sleep(ms: 1000)
}
Now if you open the Package.swift file using Xcode you can even build the project locally using the CMD+B shortcut, but don’t try to run it, since your Mac is not a SwiftIO board… 😅
If you want to build and run this project you have to target the SwiftIO board. The mm-cli can’t resolve package dependencies (yet) so you have to install the necessary dependencies (SHT3x, LCD1602) the same way as we did with the SwiftIO library. You have to clone both repositories and use the makefile to install them as local MadMachine system libraries. This will move the required files under the ~/.MadMachine/libraries folder, all the available libraries “live” there. 🔨
After you’ve installed the libraries, you can use the following Makefile for the actual binary builds:
build:
    mm build --name myProject --binary-type executable --input . --output ./myProject

run: build
    mm board --run ./myProject/swiftio.bin

clean:
    rm -r ./myProject
The mm build command invokes the swiftc compiler from the SwiftIO toolchain with the right search paths and library search paths. The mm board --run [binary] command will simply copy the necessary files to the MadMachine board if it is in download mode. You have to press the download button on the board before you run this command. Pressing the download button will mount the SD card so we can deploy the signed binary to the device, then eject the storage, which will restart the board and the new application will be loaded & executed right away. 🚀
The MadMachine IDE
If you don’t like to play with command line utilities, you can always use the MadMachine IDE to build and deliver your projects. It uses a mmp file to describe dependencies, so it can resolve them on the fly, but I don’t like the fact that I have to use a new package manager and editor to work with Swift. I’m in a love and hate relationship with Xcode (plus I’m an old-school Sublime Text fan). ❤️
Anyway, you can find really great examples with a dedicated GitHub repository and many video tutorials on the official YouTube channel. You can access all the MakerKit sample codes, they are both on GitHub and you can clone a template with a click using the MadMachine IDE.
Conclusion
For me, the SwiftIO board was a pleasant surprise. I always wanted to play with embedded systems, know a little more about hardware and low level stuff, but the Raspberry PI and the Arduino felt like alien planet. Once I’ve tried to build an app for a Raspberry PI at a hackaton, but it was a complete disaster, I was disappointed, because the tools and the developer experience was really bad.
The promise of MadMachine is that you can easily use Swift on such a device and I believe that Andy Liu created something that can have a bright future on the long term. I felt in love with SwiftIO right after I’ve assembled my first circuit and deployed my very first Swift source. It was a seamless (pain free) experience and I believe that’s a really important factor for developers who never used such devices before. This can be the beginning and the future of Swift on embedded systems. 😍
You can build some really fun stuff with SwiftIO, it’s a perfect tool for learning how electric circuits work. I can’t wait to see more and more sensors and libraries available for MadMachine. If you have an idea or a question feel free to join the official Discord server.
Related posts

All about Swift Package Manager Traits
Discover how traits act as feature flags, enabling conditional compilation, optional dependencies, and advanced package configurations.
Type-safe and user-friendly error handling in Swift 6
Learn how to implement user-friendly, type-safe error handling in Swift 6 with structured diagnostics and a hierarchical error model.
All about the Bool type in Swift
Learn everything about logical types and the Boolean algebra using the Swift programming language and some basic math.
Async HTTP API clients in Swift
Learn how to communicate with API endpoints using the brand new SwiftHttp library, including async / await support.
